How to Take Real Estate Photos: Sell Faster and for More Money
- Published on
- 15 min read
-
 Alexa Collins, Contributing AuthorClose
Alexa Collins Contributing Author
Alexa Collins, Contributing AuthorClose
Alexa Collins Contributing AuthorAlexa Collins has had her work featured by USA Today, Country Living, House Beautiful, Market Watch, and The San Jose Mercury News. Alexa has written about real estate for 3 years and has interviewed over 100 top real estate agents.
-
 Richard Haddad, Executive EditorClose
Richard Haddad Executive Editor
Richard Haddad, Executive EditorClose
Richard Haddad Executive EditorRichard Haddad is the executive editor of HomeLight.com. He works with an experienced content team that oversees the company’s blog featuring in-depth articles about the home buying and selling process, homeownership news, home care and design tips, and related real estate trends. Previously, he served as an editor and content producer for World Company, Gannett, and Western News & Info, where he also served as news director and director of internet operations.
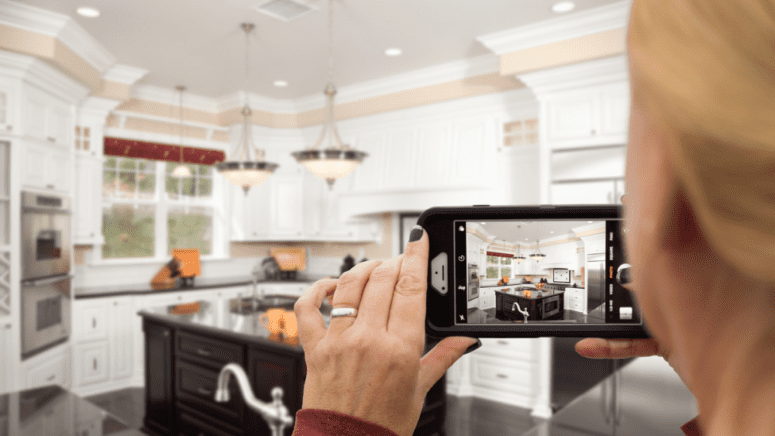
Have you ever seen a magazine spread or online feature of a house and thought, is this place even real? That’s what you’re going for when you set out to take jaw-dropping listing photos. Your photos need to be so good that when your agent lists your home, the only thing buyers will be left asking is, “Where are my car keys?”
Real estate listing photos can make or break that vital first impression for home shoppers. According to the National Association of Realtors (NAR), 43% of all homebuyers start their search online. Photos are your first and best buyer magnet.
Find a Top Agent Who Can Market Your Home for Top Dollar
Our data shows that the top 5% of real estate agents across the U.S. sell homes for as much as 10% more than the average real estate agent.
But great photos do far more than just capture the attention of potential buyers. Their impact and impressions carry through into the transaction. The right images can dramatically improve the speed of the sale and the amount of your proceeds.
Here are some powerful reasons to make high-quality photos a priority:
- Professionally photographed homes can help earn homeowners up to a 47% higher asking price per square foot.
- Top-notch photos can make your house sell 32% faster than a house with low-quality or average pictures.
- NAR reports that 41% of buyers found photos to be very helpful — that’s 2% more than buyers who considered detailed property information as helpful.
- 69% of buyers used their mobile or tablet devices to search listings.
- 51% of buyers found their homes online.
In this post, we interviewed top agents in the business, scoured real estate blogs, reviewed camera equipment, and researched the art and science that is great photography. For those with a DIY passion, we bring you the best and the brightest guide for how to take real estate photos when you are selling a house.
How to get your house ready for listing photos
No matter what your house is worth, it’s possible to make it look like 10 million bucks. But first, to prepare properly for listing photos, all of that extra stuff you have lying around has got to go.
According to Bill Gassett, a top Massachusetts real estate agent with 39 years of experience listing homes, “Buyers want and need to see the full potential of your house to picture themselves in it, but that can be difficult to do when it is covered up in your things — no matter how important they may be to you.”
First, declutter and clean every room
Start with the kitchen and take everything off the counters. That includes your toaster, microwave, blender — any kitchen appliances, utensils, towels, oils, etc., need to find another home. If you have the space, you can neatly organize them in your kitchen cabinets or pantry.
Then, scrub down every kitchen surface possible. That includes any rust that’s shown up over the years, burned substances that make your stovetop look speckled instead of white, and of course, the kitchen floor.
After completing your work in the kitchen, tackle the living room. Remove anything besides furniture and table lamps. Clear shoe racks in the living room or entryway, take down jackets and hats off any coat racks and hide pet beds. Then, clean every inch of the space, making sure to vacuum once you give the room a solid scrub.
Now, do the same for every other room. Take away everything besides large pieces of furniture and light fixtures. That means all toiletries in the bathroom need to find a different home.
Get creative with storage
If you still live in the home and need to access things like shampoo, your blender, etc., Sissie Carter, a top agent who works with 78% more single-family homes than average agents in her Georgia market, has a clever solution for organizing it.
First, box it all up and label the boxes so that they are easily accessible. Then, stack the boxes in your garage where your car would normally go. This, Carter explains, allows the “natural flow of the house to stay intact, and visitors can still walk around the boxes to see the rest of the space.”
If you have excess items that you no longer need or want, now is a great time to sell or donate them. It’ll make your move easier, your closets more available for items you do need and have to store for showings, and it will make the home much easier to stage.
Stage your home for its close-up
Now that you’ve cleaned and decluttered the house, you’ll either need to stage it yourself or bring in a professional staging company. According to HomeLight’s End of Year 2024 Top Agent Insights Report, for 38% of agents, staging is one of the additional steps sellers should take to help sell their homes, and unstaged homes, unfortunately, do not photograph well.
To make your house feel professionally staged, use objects and pops of color to create small “vignettes” in each room. These vignettes suggest how the room might be used. For example, if you have a set of outdoor tables and chairs, put two wine glasses and a bottle of wine on the table. Other popular staging choices include a bowl of fruit on the dining table, bright pillows on the couch, or new white towels hanging in the bathroom.
»Learn more: Check out our tips for home staging for more guidance.

Professional vs. amateur: What’s the difference?
If you decide to take your listing photos yourself, then you need to make sure they look professional. There’s a huge difference between professional listing photos and amateur photos, and buyers will be able to tell. Plus, the professional photos will make your house look amazing online. Amateur photos will not.
The photo below is an amateur shot, and there are several ways to tell.

The angle: All seasoned professional real estate photographers will use a wide-angle lens, and this is not a wide-angle shot. None of the lines are straight. This isn’t a good angle to shoot the bathroom at either — we can’t see everything, and it feels odd and chopped off.
The lighting: There’s not enough natural light in the photo, and it looks more lit by artificial sconces than by sunlight.
The details: You can see reflections in the mirror and reflections on the shower door. There’s no way to see what the view out of the bathroom window is; the light blows it out.
The mechanics: It looks like this shot was taken freehand instead of with a tripod.
Now, take a look at the professional photo below:
 Image via Ben Heinrich
The angle: The photo is shot with a wide lens, and the angle is perfect: you can see every little detail.
The lighting: There is plenty of natural light, and the colors are warm and vibrant.
The details: You can see the view out of each window, which the photographer has cleverly captured with the mirror reflection.
Though the differences may be subtle, the professional photo is a much better depiction of the house than the amateur photo. If you aren’t sure you’re up to the task, that’s okay! A top real estate agent will hire a vetted, tried, and true professional photographer to capture your home.
If you’re ready to take your own real estate listing photos, let’s continue.
Great listing photos vs. bad listing photos
We sat down with Carter to chat about the dos and don’ts of taking real estate photos.
“I was in a neighborhood, and the exact same floor plan that I was selling came on the market,” she recounts. “The sellers did not use a professional photographer. Their pictures came out discolored. The hardwood floors looked orange, and the cabinets looked a little orange…it makes a huge difference…I think that photos are extremely important in selling a home quickly.”
To show us how to knock real estate listing photos out of the park, Carter shared a few of her favorite professional photos with us. The photos were all taken by an expert professional real estate photographer.


Tips to shoot better real estate listing photos
Must-have materials
You can’t control nearly as much with an iPhone as you can with a high-quality camera. You also need to shoot with a wide lens. So, you need to rent, borrow, or purchase a high-quality camera (DSLR), tripod, and wide-angle lens.
There are many quality, affordable DSLR cameras to choose from these days. For real estate photography, here are a few popular choices that range from $450-$2,500, depending on the accessories you choose.
- Canon EOS Rebel SL3 ($750)
- Nikon D3500 ($450)
- Sony A7R III ($2,200)
For more gear recommendations, check out this comprehensive list.
A wide-angle lens is essential for getting proper listing photos. A wide-angle lens is the difference between shooting one image and getting half the room, and shooting one image where you can see the full space. You need to use a wide-angle lens for every shot! If you have the Canon, try the Sigma 10-20mm f/3.5 wide angle lens.
 Image Via Content Creators Lounge
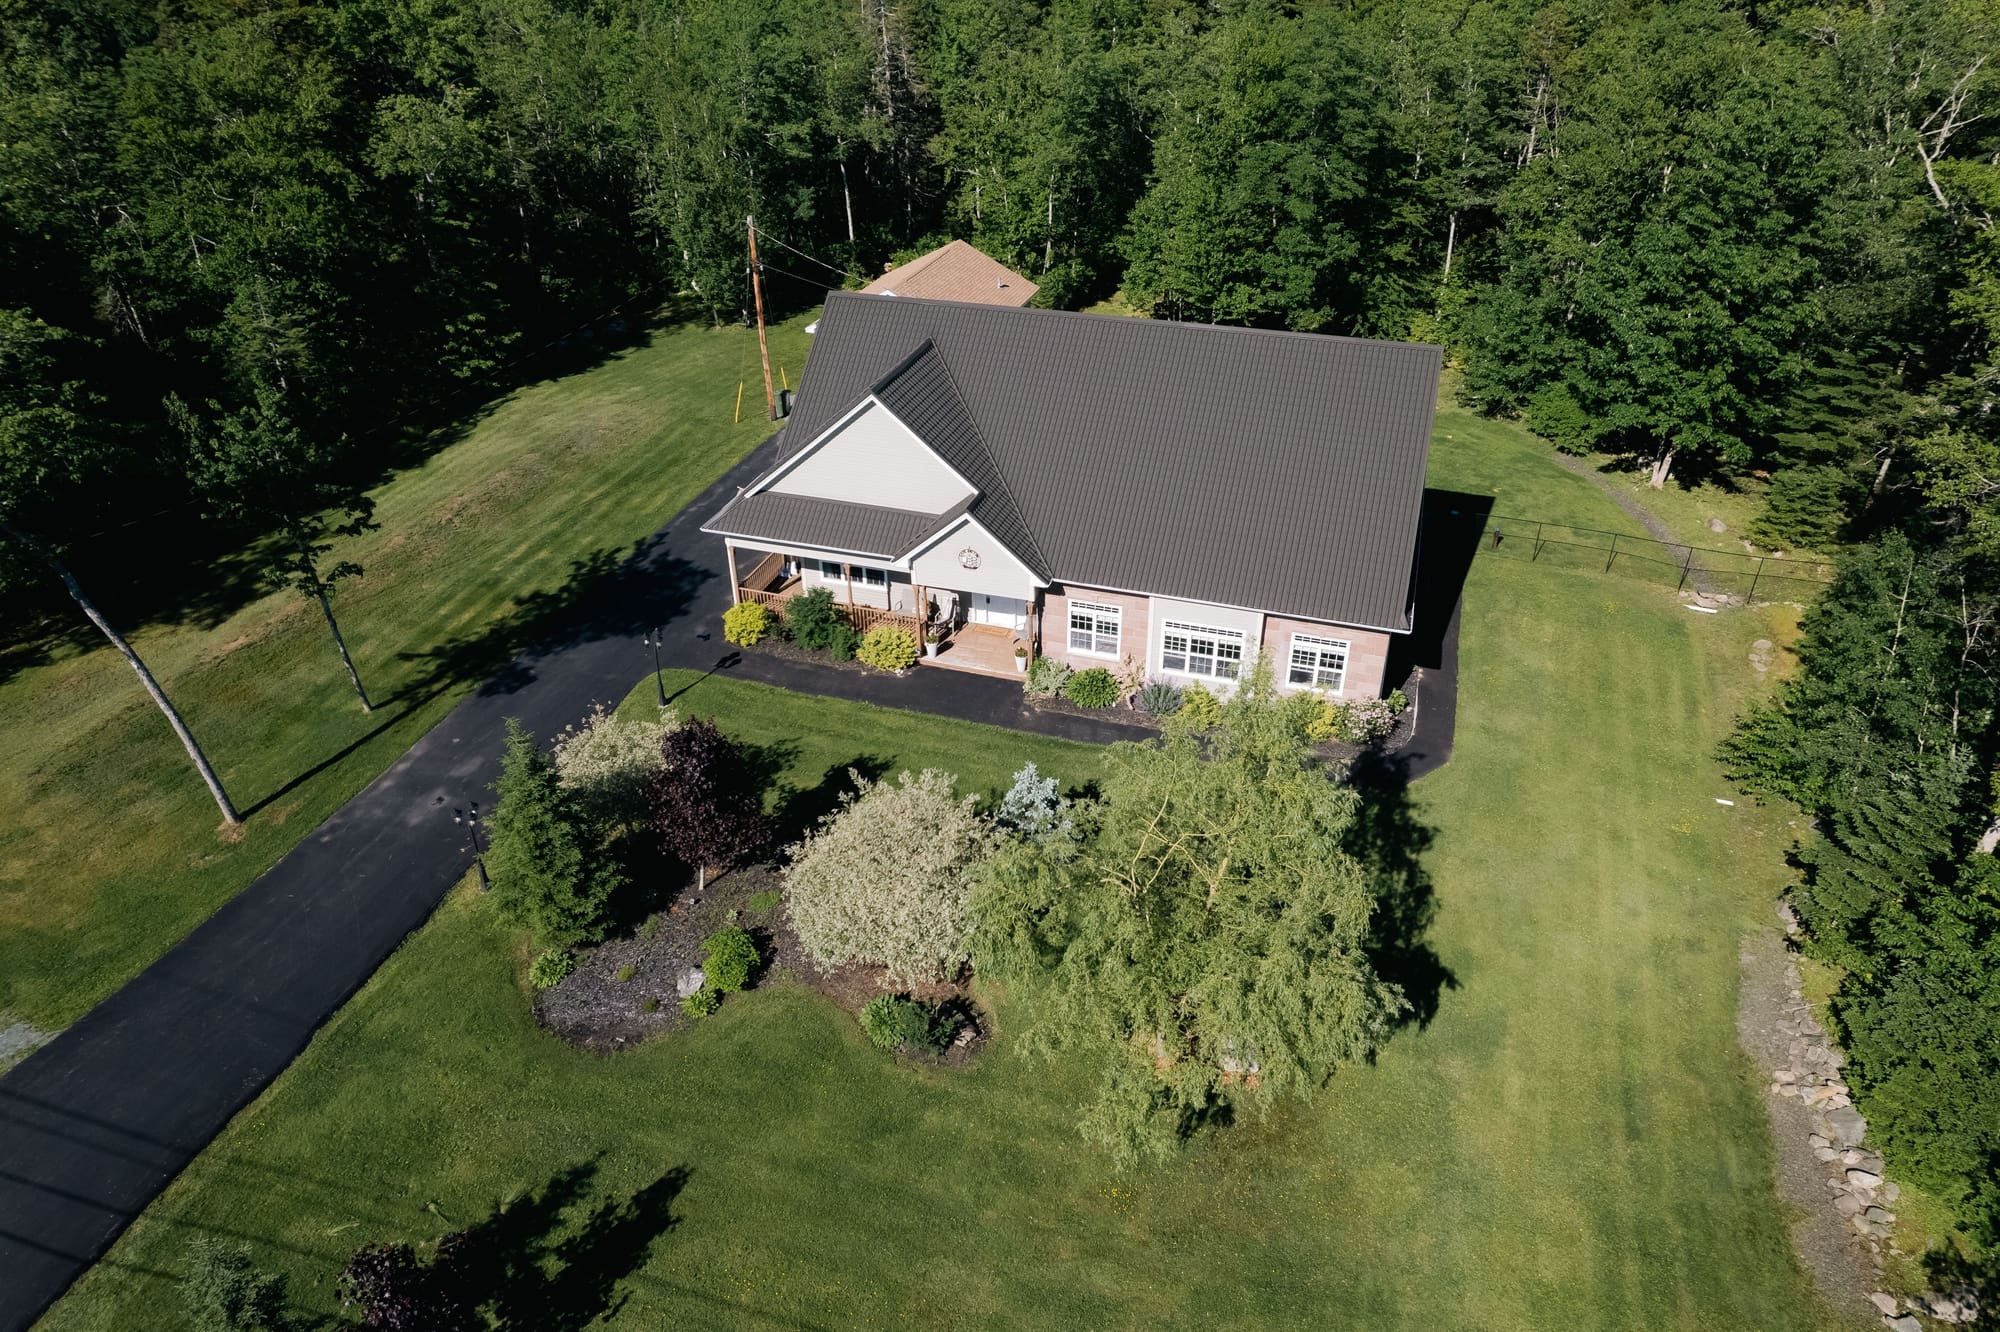
Leveraging drones for aerial real estate photography
In the age of sophisticated gadgets, cameras on the ground just won’t cut it. Many of your potential buyers will expect to see aerial shots of the property, especially if it’s a sizeable estate. Aerial real estate photography has revolutionized the way properties are showcased by providing prospective buyers with unique perspectives that ground-level photos simply can’t achieve.
Drones, also known as unmanned aerial vehicles (UAVs), enable real estate photographers to capture breathtaking shots that highlight a property’s layout, surrounding landscape, and neighborhood features. Here’s how to leverage drones effectively in real estate photography:
- Showcase property size and boundaries: Aerial photos can provide a bird’s-eye view of the entire property, helping buyers understand the full scope of the land, layout, and features, such as backyards, pools, and driveways. This is particularly valuable for larger estates or homes with outdoor amenities.
- Highlight the neighborhood and location: Use drones to capture nearby landmarks, green spaces, schools, or waterfronts, emphasizing the property’s surroundings and lifestyle advantages. Buyers often consider location just as important as the home itself.
- Create dynamic listing videos: Beyond still photos, drones can produce cinematic, high-quality videos. A smooth flyover of the property, paired with indoor transitions, provides a complete and immersive virtual tour experience for buyers.
- Capture unique angles: Drones allow you to capture creative angles and perspectives that elevate a listing. Overhead shots of rooftops, gardens, or scenic views from above can add a “wow” factor to your marketing materials.
- Ensure compliance with FAA regulations: When using drones, it’s important to comply with local laws and Federal Aviation Administration (FAA) regulations, which include licensing for commercial drone pilots and adhering to no-fly zones.
Investing in drone photography can set your real estate marketing apart, creating visually stunning and engaging listings that attract more buyers. Some of your drone options include the DJI Mini 2 Fly More Combo, Ruko F11GIM2, and Holy Stone HS720G.
Key camera settings for real estate photography
For more control during the photo-editing process, you should shoot in RAW instead of in JPEG. RAW photos give you a better ability to change an image — they’re basically negatives that haven’t been finished yet. You have more control over the exposure of the image, the white balance, highlights and shadows, contrast, and more.
They’re much larger files and are unusable without editing, so you will have to do more to finish them. If you want to do less work in post-production and know that you can get the shots right the first time, then shoot in JPEG.
You’ll want to set the aperture, ISO, and shutter speed of your camera. The aperture controls how much light comes in through the lens, and the ISO controls how sensitive the camera is to light. The shutter speed controls how long the camera lets light reach the sensor.
Recommended real estate photography settings:
- Aperture: Between f/7.1 to f/9
- ISO: 400 or lower
- Shutter Speed: Between 1/60 and 1/2 a second
Lighting 101: When to shoot
The best lighting for indoor photos is when the sun is bright and shining. Outdoor shots are best taken at dusk. Avoid cloudy, rainy, and overcast days, as they can cause bad lighting and an uneven white balance.
If you want to get even more technical about it, the best time to shoot depends on the way each room (and the house) faces. You want the sun to be behind the camera so that colors are illuminated. For example, when taking photos of an exterior, you can assume that you should shoot an East-facing house in the morning, a West-facing house in the afternoon, a North-facing house from 10 a.m. to 4 p.m., and a South-facing house in the early am or just before the sun sets.
For interior shots, consider the placement of the windows in every room and evaluate the position of the sun. Then, take a few test shots to determine if the light is perfect. You should be able to see the colors and details in the room, but the shots shouldn’t be so bright that colors and windows are blown out.
You should never rely on artificial lighting in a room unless the house is dark itself and every lightbulb in the room is the same.
What colors work best in real estate photos?
If you’ve ever been to an open house or seen listing photos where every wall in a house is painted a bright, neon shade, it can be overwhelming. It also means that the minute buyers get the keys, they’ll have to paint.
If you’re a big fan of bold hues, it’s time to get out the paintbrush or hire a crew to paint the home.
Carter recommends: “If they’ve got a bright color like a lime green, it does not shoot as well as a neutral color does. Even a darker color shoots a little bit better than some of those brighter colors: the pinks and the purples that they use in some of the bedrooms for the kids. They just don’t turn out as well. So the lighter shades seem to work better and make the room feel larger.”
If you need a light and neutral shade, opt for an ever-popular off-white like “Silky White” by Behr.
If you’re all about color, then do pops of yellow. According to Carter, yellow is a bright, warm, and welcoming color that can ignite a sense of feeling at home. Try yellow throw pillows on the couch, a bowl of lemons, or a bouquet of yellow flowers (if you plan to refresh them any time there is a showing).
Get a Free Home Value Estimate
Get a near-instant real estate house price estimate from HomeLight for free. Our tool analyzes the records of recently sold homes near you, your home’s last sale price, and other market trends to provide a preliminary range of value in under two minutes.
Create the perfect composition
There are many different schools of thought on the best way to create the best composition for each photo. Some photographers believe in head-on shots, others stick by shots from the corner of the room, and others say to mix it up and find the most creative angle you can.
Since every space is different, try shooting at each of those angles: take a shot head-on, take one from the corner of the room, and then take a photo from another spot in the room you think will come out well.
If you want to get technical about it, take a shot at a 1-point perspective and a shot at a 2-point perspective. Basically, a shot at a 1-point perspective will have a central focal point like the corner of the room or the fireplace. A 2-point perspective shot will have two “vanishing points” or points of focus.
Make sure that all vertical lines in the image are perfectly vertical. This is where your tripod comes in handy!
In the living room and family room, the camera should be set anywhere between 36” and 48” high, or about the height of a person sitting down while watching the entertainment system. The reason there’s such a large gap is because there’s a large variety in furniture height.
The optimal camera height depends on your space and the way you have it set up. You need to use your best judgment so that you get as much of the room as possible. Don’t focus as much on your furniture: you’re selling the house, and features like crown molding and built-ins should take priority over personal items.
In bedrooms, the camera should be 15”-20” higher than the bed, and in the kitchen, the camera should be 15”-20” higher than the kitchen counter.
A good rule of thumb to stick by is that you want to capture more floor than ceiling. Floors are often patterned and interesting, especially if you have decorative tile or hardwood.
Tell a story with your real estate photos
If a buyer finds your listing online, the photos are what you have to win them over. So, the photos need to create a compelling story of your home.
The best way to tell this “story” is with great photos (of course!) and the order you present the photos with the listing. Expert agent Kathleen Caponigro recommends putting the photos in the order you would enter the home.
The order should be: the exterior, then the entryway, kitchen, dining room, living room, master, and then any additional bedrooms.
Anyone who finds your house online should then feel like they’re walking through the home just like they would at an open house or if they lived there.


A quick guide to post-production
Adobe Lightroom and Box Brownie are about to be your best friends. First off, if you’d like to do all of the editing yourself, you can do a free trial of Adobe Lightroom and change everything manually. If you go the Lightroom route, you’ll need to adjust: exposure, white balance, clarity, contrast, HSL, highlights, and shadows. You’ll also need to straighten the image if it’s crooked.
Or, if you want to pay for a service to perfect your photos for you, Box Brownie is affordable, and you’ll be surprised at just how great the before and after shots look. Box Brownie charges $1.60 per photo, and they’ll make all the right enhancements so that every one of your images looks professional. Plus, Box Brownie is specifically a real estate tool, so they’ll edit the images with a buyer’s eye in mind.
You can also submit exterior photos to Box Brownie and have them change daytime photos to dusk photos. This is amazing since it might be difficult to get that perfect sunset shot yourself.
The Importance of Twilight Photography for Real Estate
Don’t miss the moment! The last hour before sunset and the last hour before sunrise, also known as magic hour or golden hour, give your home the perfect backdrop to entice buyers.
If you can get a workable collection of photos done yourself, then they can do the rest to make your images ready for your listing.
Using virtual staging to enhance real estate photos
Don’t have a lot of budget for professional staging? Look into virtual staging. It is a powerful tool for transforming empty or cluttered spaces into beautifully designed rooms that resonate with buyers.
Unlike traditional staging, virtual staging uses digital tools to add realistic furniture, decor, and design elements to photos of a property. This method is cost-effective, highly customizable, and an excellent way to help buyers envision the home’s full potential.
- Why Virtual Staging Matters: Empty rooms often feel cold and uninviting in photos, making it difficult for buyers to imagine their own furniture in the space. Virtual staging solves this by showing how a room can be used and creating an emotional connection with the buyer.
- Cost-Effective Compared to Physical Staging: While traditional staging can cost thousands of dollars, virtual staging is significantly more affordable. It allows you to “stage” multiple rooms or create several design options without the logistical challenges of moving furniture.
- Highlight a Home’s Versatility: Virtual staging can be used to demonstrate different uses for a single space, such as turning a spare bedroom into a home office or a storage area into a workout room. This versatility helps potential buyers see how a property can meet their unique needs.
- Customize to Target Audiences: Virtual staging allows you to tailor design styles to the preferences of your target market. For example, you can create a modern aesthetic for younger buyers or a traditional design for families, making the home more appealing to specific demographics.
- Keep It Realistic: To avoid misleading buyers, it’s important to ensure that virtual staging looks realistic and accurately represents the space’s dimensions, lighting, and architectural features. Choose high-quality virtual staging providers to achieve professional results.
Virtual staging is a game-changer in real estate marketing, offering an affordable and flexible way to bring empty spaces to life. With that said, you still need to have high-quality photos of the space before you can stage it virtually!
Market your home right from day 1
According to research by the NAR, photos were the most useful website feature for almost nine in 10 buyers aged 58 and younger — some of the largest homebuyer segments. If your house doesn’t show well online, there’s less reason for these potential buyers to come see it in person.
The photos of your home set the stage from the beginning for how much activity and what kind of offers your house will get.
If you don’t feel up to it and want a professional to take over, then don’t worry. HomeLight can connect you with a top real estate agent in your market with expert photography contacts to help get your home sold fast and for the highest proceeds.
Header Image Source: (Feverpitch/ Depositphotos)
- "Highlights From the Profile of Home Buyers and Sellers," NAR (November 2024)
- "Hot Real Estate Photography Statistics You Need to Know in 2025," Photoup, Gregory Gronbacher (2024)
- "25+ Mind Blowing Real Estate Photography Statistics," Photoup, Stina Pettersson (September 2024)
- "Real Estate Photo Equipment Guide – 10 Must-Have Items," Fix the Photo, Tata Rossi & Tetiana Kostylieva (January 2025)
- "The Ultimate Guide to Real Estate Drone Photography," Photoup, Gregory Gronbacher (January 2023)
- "Real Estate Photography Pricing, Types & Hiring Tips Guide", Fit Small Business (July 2023)
- "From JPEG to RAW: A Beginners Guide to Start Shooting in RAW – The Easy Way," Christina Greve (February 2020)
- "6 Things I Wish Real Estate Photographers Would Do," The Decorologist (January 2022)
- "10 Tips for Gorgeous Interior Photography," Digital Photography School, Neil Creek (October 2023)
- "What is Magic Hour in Photography?," Scouty (September 2024)
At HomeLight, our vision is a world where every real estate transaction is simple, certain, and satisfying. Therefore, we promote strict editorial integrity in each of our posts.