
Follow This Home Maintenance Schedule To Keep Your House in Top-Selling Condition
- Published on
- 15 min read
-
 Catrina Sun-Tan, Contributing AuthorClose
Catrina Sun-Tan Contributing Author
Catrina Sun-Tan, Contributing AuthorClose
Catrina Sun-Tan Contributing AuthorCatrina is a native San Franciscan with a B.A. in Psychology and minor in Cinema and Media Studies from Wellesley College. A storyteller at heart, she loves to write about people, films, and of course, real estate. Don't be surprised if you catch her browsing luxury homes on Instagram or obsessing over the latest market trends.
-
Taryn Tacher, Senior EditorClose
Taryn Tacher Senior Editor
Taryn Tacher is the senior editorial operations manager and senior editor for HomeLight's Resource Centers. With eight years of editorial and operations experience, she previously managed editorial operations at Contently and content partnerships at Conde Nast. Taryn holds a bachelor's from the University of Florida College of Journalism, and she's written for GQ, Teen Vogue, Glamour, Allure, and Variety.
If a pipe bursts in the kitchen, you’re immediately on the phone with a plumber in one hand and scooping water into buckets with the other. But dirty gutters? A leaky faucet? That deep crack in the driveway? It can always be put off until tomorrow; that is, if these issues cross your radar at all.
An American Home Shield survey revealed that 59% of homeowners put off necessary repairs due to cost, with 33% saying they can’t afford an emergency repair costing over $1,000. But neglecting home repairs can make it more difficult when it comes time to sell.
What's Your Home Currently Worth?
Home maintenance is an essential step to preserving home value. Get an estimate of what your house is worth today.
So, we’ve created this home maintenance schedule with a laser focus on the big-ticket issues that will haunt you down the road if they fall into disrepair. To carefully vet our top to-dos, we talked to real estate agents who’ve done hundreds of home repair negotiations and the executive director of the National Home Service Contract Association (NHSCA), which educates consumers and regulators on the repair and replacement of household appliances.
Get all the details you need for each maintenance task below. Then, with a simple click of a button, you can directly transfer the year-round home maintenance schedule to your own Google calendar, and keep yourself accountable.
Maintenance priority: Prevent water damage
Excessive exposure to water makes your home vulnerable to problems like mold and pests, and will eventually spoil its overall structural integrity.
Maintenance tasks
1. Clear out the gutters (Frequency: at least twice a year)
Gutters keep rain and water away from the side of your home, and without regular maintenance, stuffed gutters can’t do their job. Water will overflow and drown your foundation, and cause soil erosion around your home. In addition, when gutters get too heavy, they can fall off your roof, cause leaks, and $2,000 to $6,000 on average for gutter replacement.
Not sure how to tackle cleaning the gutters? Use this handy step-by-step tutorial from Bob Vila, an expert DIY home improvement source.
2. Recaulk your bathroom fixtures (Frequency: Once every 5 years)
One of the most affordable ways to keep your bathroom in top-notch condition? Recaulk your tub, showers, and bathroom tiles to prevent mold and water damage.
Caulk acts as a sealant to prevent fixtures, such as your toilets, showers, and tubs, from leaking. But over time, caulk harbors bacteria, mildew, and odors, which permanently discolor the once-clean white borders.
Check your caulk’s condition at least once a year for any signs of visible leaks, discoloration, or damage — but at the very least, tackle this job once every 5 years.
3. Check your major appliances for leaks (Frequency: at least once a year)
Your larger and often-used appliances like the refrigerator, washing machine, and dishwasher need a deep clean and inspection at least once a year. A yearly checkup helps you spot any leaks and schedule a tune-up with a professional if necessary.
The best way to control mildew and mold is to rein in moisture and dampness. Regular upkeep can keep the appliances running efficiently and even extend their lives.
If you find a small pool of water under your refrigerator, check the drain pan under the fridge. A crack in the drain pan, which captures the condensation from your fridge, might be the cause of leaks. You’ll need to contact your manufacturer or a technician to replace or repair that part of the fridge.
4. Test your sump pump (Frequency: at least once a year)
If you live in an area that experiences heavy storms and rainfall, you should check on your sump pump at least once a year. Its sole purpose is to pump out excess water from your home in the case of heavy rainfall or storm.
Roto-Rooter, a top plumbing service in the U.S. that has been operating since 1935, offers a quick sump pump inspection guide that any homeowner can consult.
“Test the sump pump to make sure that it works because the home inspector is going to test this,” says Jennifer Hupke, a top-selling real estate agent in Milwaukee, Wisconsin. You don’t want to find out that it’s broken during a storm because of the flood in your basement.
“A lot of people will put battery backups on their sump pumps because if, for whatever reason, the power goes out and the sump pump stops working and it pours, that’s going to all end up in your basement.”

Maintenance priority: Keep your home’s structural integrity intact
Your house is an engineering feat that any interior or exterior damage can compromise. From the soil of your foundation to the shingles on your roof, you need to maintain your home’s structure yearly.
Start with these DIY tips, but if you notice larger problems that fall outside your comfort zone, like jammed doors and uneven floors, call a contractor immediately to get a professional’s help and opinion.
Maintenance tasks
1. Investigate for signs of a termite infestation (Frequency: once a year)
“Pests can cause tons of problems in your home,” says Art Chartrand, Executive Director and Counsel for the NHSCA. “Worst, of course, is termites. Never, ever buy a home without a termite inspection. They can be eating your home alive, and you don’t even know about it.”
Tiny, white, and ant-like — termites cause more than $6.8 billion in property damage every year in the U.S. They emerge in colonies and chomp away at your home’s structure. The only way to keep them from building mud channels into your home is to conduct a yearly termite inspection with a professional.
Chartrand explains that homeowners insurance doesn’t cover termite damage or infestations, since this issue can be maintained and prevented.
How can you check for signs of trouble? “Push on your woodwork, like underneath your window, and if you can push your thumb into it — it’s bad,” says Chartrand.
2. Do a visual inspection of your foundation (Frequency: once every 6 months)
If you see jammed doors or windows, cracks larger than ⅛ of an inch along walls, or cracks larger than a dime on your basement floors or exterior foundation, hire a contractor to inspect the damages. Identify them early to avoid structural damage to your house that decreases your home’s value and safety.
Another pro tip: You might think that watering your lawn is useless during the hot summer months, but Chartrand warns against letting the yard get too dry, and not for the sake of the grass.
“You still need to water your plants because of your foundation,” he says. “When the foundation gets too dry, or the dirt around it gets too dry, it will recede. Then you get ground shifting and cracks in the foundation.”
If you live in an area that experiences dry periods of summer, it might be a good idea to install a sprinkler system that adds moisture to your foundation. A dry and cracked foundation can make your home literally sink into the ground.
Water your foundation and lawn at dawn and dusk during the summer months to hydrate the soil around your house and prevent your foundation from falling apart right under your feet.
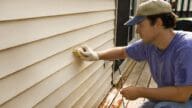
3. Touch up exterior paint (Frequency: Once a year)
Over the years, exposure to the elements causes your exterior paint to chip and crack, inviting water and moisture to seep in and eat away at the wood. Wood rot does more than make a house look bad; it threatens the structural integrity of the home by making it vulnerable to termites and severe weather.
Peeling paint can also limit your pool of buyers. For buyers seeking Federal Housing Administration (FHA) or Veterans Administration (VA) loans, peeling paint can hinder their ability to get mortgage financing.
To touch up your exterior paint, first you’ll need to color match. Cut a paint chip from your home’s exterior and bring it with you to the paint store. Then, purchase paint brushes, primer, and a bucket of your paint color. Finally, scrape, prime, and repaint the damaged areas.
If touch-ups won’t suffice, consider repainting the exterior of your house.
4. Schedule a roof inspection (Frequency: twice a year — once in the fall, and once in the spring)
Maciek Rupar, Technical Services Director of the National Roofing Contractors Association, recommends scheduling a roof inspection in the fall before the cold weather hits, and another in the spring to check for damages after winter takes its toll.
The roofer will check for any missing or broken shingles, exposed patches, and algae build-up. (Note that if your roof is more than 25 years old, it will likely need to be replaced.)
In addition, check up on any other roof-related features, like skylights or chimneys (if you actively use your fireplace), for any unwanted guests. Your chimney might have freeze-thaw damages or cracks from use over time.


Maintenance priority: Maintain electrical systems and implement safety measures
From routinely checking outlets to simply replacing light bulbs, electrical maintenance keeps your monthly bills low and gives you the peace of mind that your wires and plugs won’t combust.
Maintenance tasks
1. Swap out old lights with energy-efficient bulbs (Frequency: once a year)
A yearly lightbulb switch can stop your bulbs from burning out too quickly or even exploding.
Still rocking old-school incandescents that need frequent replacement and give off tons of heat? Swap them out with energy-efficient or LED bulbs that give off the same level of brightness while sucking up less energy.
LED bulbs cost more money upfront, but they can slash an average of $225 per year off your electricity bill. According to The New York Times, energy-efficient LED light bulbs are the new standard for basic lighting. They also come in different styles for any type of lighting you need.
If you suspect that there’s an issue with your home’s electrical system (such as a bill that’s higher than usual, plugs that don’t work, or lights that won’t turn on regardless of lightbulb change), hire an electrician who can properly inspect, identify, and repair any electrical issues.
2. Test your smoke and carbon monoxide alarms (Frequency: once a month)
The National Fire Protection Association recommends that you install smoke detectors on each floor of your home, in all bedrooms, outside of sleeping areas, as well as in hallways to be up to code. As for carbon monoxide detectors, those should be present on all floors, especially outside sleeping areas, in the kitchen and dining areas, and in the garage.
The U.S. Fire Administration advises testing your smoke and carbon monoxide alarms once a month and replacing the batteries once a year. The tests are similar in steps:
Smoke detector
Step 1: Press the test button on the alarm.
Step 2: A piercing noise should go off. If the noise is weak or doesn’t occur, replace its batteries.
Carbon Monoxide
Step 1: Contact your alarm security company to let them know you are conducting a test.
Step 2: Press and hold the test button. You should hear two beeps.
Step 3: Repeat Step 2, but this time, you should hear four beeps. After 10-15 minutes, your alarm should return to the original setting.
You might even want to consider installing 2-in-1 smoke and carbon monoxide detectors that have the same testing procedure. This way there’s no double-duty when testing or replacing batteries.
3. Vacuum under and behind your fridge, dishwasher, and washing machine (Frequency: once a year)
When was the last time you looked under your refrigerator and dishwasher, or behind your washing machine? Probably not since you had them installed.
Imagine all the frozen peas, dust, and socks that have accumulated in their crevices. Chartrand recommends cleaning under and behind these appliances to chase away the dust bunnies and to keep everything running efficiently.
Refrigerators use up to 7% of your home’s electricity. Washers and dryers are also among the appliances that use the most electricity at home. A yearly electrical checkup on these appliances can help make sure they aren’t eating away at your electricity bill.
This also helps to identify leaks and small puddles early on, and ward off any mold buildup or water damage issues before they spiral out of control.
Maintenance priority: Inspect and clean plumbing systems
Keep tabs on your plumbing fixtures and exposed pipes to see if they are leaking, rusting, or broken. Regular maintenance of your plumbing system will catch water damage early and curb any larger plumbing issues that might occur down the line.
Maintenance tasks
1. Check on the visible condition of your pipes and fixtures (Frequency: once a year)
To look for leaks and identify plumbing issues before they get out of hand, conduct a DIY pipe and fixture inspection of all the visible pipes, toilets, faucets, and shower heads in your house.
If you notice any of the following plumbing issues, you probably have leaks in your home:
- Continuous sound of running water when you aren’t using it
- Sudden increases in your water bill
- Rotting smells from walls near water sources
- Bubbling wallpaper on your walls
- Change in water meter reading
Check if visible pipes are corroded, rusty, or broken. Is there discoloration at the bottom of your toilets? Do your faucets constantly drip in the middle of the night and the handles squeak when you twist them? Is there back flow of water in your sinks or shower tubs?
Schedule a plumbing inspection if any of these problems come up to avoid larger and more expensive issues in the future.
2. Clean your garbage disposal to keep it functioning properly (Frequency: once a month)
With all the leftovers you shove down the sink on a daily basis, an uncleaned, unmaintained garbage disposal quickly becomes smelly and inefficient to use.
Clean it once a month, and you won’t have to deal with funky odors or a surprise malfunction.
Use these two easy DIY methods in combination to maintain your garbage disposal like a pro:
- Frozen lemon peels – Place frozen lemon peels in the disposal and grind them up with the water running. This helps get rid of food build-up on the blades.
- Baking soda and vinegar – Mix one cup of vinegar and one cup of baking soda, pour it down the drain, and let it fizz. Then, add a cup of boiling water and let sit for 10 minutes before turning the faucet on warm and switching on the garbage disposal for a few seconds until the mixture disappears.
3. Drain all the water from your water heater (Frequency: Once a year)
As part of its regular maintenance, a water heater should be drained once a year. This will keep it from malfunctioning during your daily routine, especially in the winter months when you least want to have a cold shower. If you aren’t comfortable doing a water heater drain yourself, call a professional plumber to carry it out for you.
It’s also a good idea to inspect the pressure and temperature of your water heater every other month. The lifespan of a water heater is only about six to 12 years, so take note of its age, and ask your plumber if it needs a replacement or repair.
Maintenance priority: Clean your HVAC (Heating, Ventilation, Air Conditioning)
Your HVAC controls and affects the air you breathe, so it’s important to ensure routine maintenance. Poor care of your HVAC system can lead to health problems.
Maintenance Task
1. Change out your HVAC air filters (Frequency: at least once a month)
Chartrand regards this as the number one thing a homeowner can do to maintain their home. He says, “Change your air filters often — if you have a pet, even more often. I change my air filters every 30 days. If you’ve ever looked at a filter that hasn’t been changed in a while — I mean, that’s the air you breathe.”
HouseLogic.com, a NAR site offering expert tips and tools for homeowners, provides an HVAC maintenance checklist that will prolong its life and keep it running for the next set of homeowners.
You don’t want to drop thousands for a new unit just to pass the home inspection. Instead, regularly check your HVAC system, change the filter, and hire a technician to fix issues that you can’t handle.
“Everyone who has an HVAC for a couple of years needs an inspection,” says Chartrand. Call an HVAC technician who knows what to clean and repair for a thorough inspection of your home’s heating and cooling systems.
Keep tabs on the big-ticket items all year
Cleaning the sink and checking your caulk for mold sounds like the worst weekend plan ever, but a home requires a lot of TLC, and if you don’t keep up with it, who will? Your procrastination will show up all over the home inspector’s report when the time comes to sell.
Remembering all these details isn’t easy, so our year-long home maintenance schedule will keep you on track. Simply add the calendar to your personal calendar and you’ll never miss a beat.
Home maintenance schedule FAQs
A home maintenance schedule helps homeowners proactively address the wear and tear that naturally occurs over time. By staying on top of routine tasks, homeowners can prevent minor issues from becoming costly problems, preserve their home’s value, and ensure a safe living environment.
Ideally, homeowners should review their maintenance schedule at the start of each season. Different seasons can bring unique challenges and requirements for home upkeep, so it’s beneficial to adjust tasks based on the time of year.
While all maintenance tasks are important, some can be critical for safety and preventing significant damage. These include checking smoke and carbon monoxide detectors, inspecting the roof for leaks or damages, cleaning gutters, servicing major appliances, and ensuring the home’s HVAC system is functioning efficiently.
Many homeowners find it helpful to use digital tools like calendar apps, specialized home maintenance apps, or reminders on their smartphones. For those who prefer analog methods, a printed checklist or dedicated maintenance journal can also be effective.
While many tasks on a maintenance schedule are DIY-friendly, certain jobs might require specialized skills or equipment. Be realistic about your capabilities and comfort level. For tasks like electrical work, major plumbing issues, or HVAC servicing, it’s often best to consult a professional to ensure safety and proper execution.
Header Image Source: (David McBee/ Pexels)
- "60% of Homeowners Are Putting Off Necessary Home Repairs or Maintenance," Finance Buzz, Josh Koebert (May 2024)
- "How Much Does Gutter Installation or Replacement Cost In 2024?," Forbes, Lawrence Bonk (July 2024)
- "How To Handle Roof Runoff Without Gutters," Today's Homeowner, Matt Greenfield (June 2024)
- "How to Clean Gutters: The 5 Best Ways to Get the Job Done", Bob Vila, Glenda Taylor (November 2023)
- "How to Caulk a Bathtub or Shower", Better Homes & Gardens (December 2023)
- "Does Homeowners Insurance Cover Termite Damage?", Allstate (July 2024)
At HomeLight, our vision is a world where every real estate transaction is simple, certain, and satisfying. Therefore, we promote strict editorial integrity in each of our posts.