
How to Earthquake-Proof Your House for Safety: A Rock-Solid Guide
- Published on
- 8 min read
-
 Presley Attardo Contributing AuthorClose
Presley Attardo Contributing Author
Presley Attardo Contributing AuthorClose
Presley Attardo Contributing AuthorPresley is a Seattle based writer covering interior design trends, home improvement, and market updates. She has lived in San Francisco, Los Angeles, Chicago, and Washington, D.C., giving her a unique perspective on the diversity of U.S. real estate.
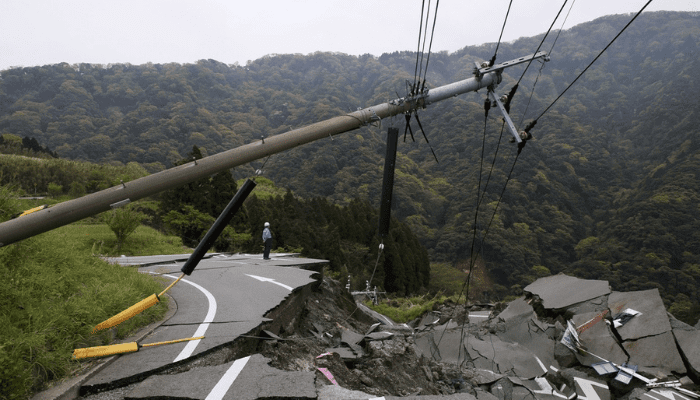
The last time you felt a tremor in your house, the pendant lamp swayed, the pool water spilled onto the patio, and your pen rolled toward the edge of the table — all innocent indications of an earthquake. But what if next time an even bigger earthquake hits: would your house survive?
Homeowners who overlook earthquake safety put their home and family at risk for physical and financial damage. Unlike other natural disasters, there’s no way to predict when the next earthquake will strike, meaning last-minute preparation is not an option.
“We live in environments that have hazards built into them, and it’s incumbent upon us to understand those hazards and make the appropriate adjustments in how we live our lives,” remarks Dr. Steven J. Jensen, Advisor of Emergency Management at California State University at Long Beach and member of the American Red Cross Scientific Advisory Council.
With this guide, you’ll know definitively how-to earthquake proof your house from top to bottom, make reasonable preparations big and small, and carry on enjoying your home.
Earthquake risk, explained
The U.S. Geological Survey (USGS) defines earthquake risk as “the probable building damage and number of people that are expected to be hurt or killed if a likely earthquake on a particular fault occurs.”
More regions fall under some level of earthquake risk than you might expect. USGS recently identified 16 states at high risk for experiencing a damaging earthquake in the next 50 years:
- Alaska
- Arkansas
- California
- Hawaii
- Idaho
- Illinois
- Kentucky
- Missouri
- Montana
- Nevada
- Oregon
- South Carolina
- Tennessee
- Utah
- Washington
- Wyoming
This past spring, scientists at Stanford University compiled an even more comprehensive seismic stress map, extending earthquake risk to Oklahoma and Texas where “industry-triggered” earthquakes are likely to occur due to fracking.
Hugo Pompa, a top real estate agent in Santa Ana, California, who works with plenty of homes considered at-risk for earthquake damage, comments that Californians are fairly nonchalant about earthquake risk, despite studies showing that the state has a 99% chance of having one or more magnitude 6.7 or larger earthquakes within the next 30 years.
“It’s something that we live with,” Pompa says. “We’re always talking about ‘the big one,’ and we did see the big ones that have happened in the past — Northridge and San Francisco, but most earthquakes we have are not that big.”
Earthquake hazards
In addition to ground shaking, earthquakes often trigger a host of catastrophic events, known as “earthquake hazards.” USGS defines these hazards as “anything associated with an earthquake that may affect the normal activities of people,” including:
“Fire following an earthquake is one of the really big issues that are out there,” says Dr. Jensen, who has played a major role in recovery efforts, research, and consulting for major global earthquakes, including the 1994 Northridge earthquake in Southern California and the 2010-2011 Christchurch earthquakes in New Zealand.
“If you look historically at some of the big earthquakes, San Francisco for example, fires raged for three days after. Tokyo was a very similar thing in 1923. Many urban areas are very vulnerable if the conditions are right. In Los Angeles, if we got an earthquake that hits large parts of the metropolitan area, the fire service could be compromised in its ability to get around there, because they have very limited capacity anyways.”
Determine your home’s earthquake vulnerability
The first step to earthquake-proofing your house is to research your home location and structural history. Factors such as proximity to fault lines, ground soil, nearby natural features such as hills and oceans, building age, and building condition all play a role in your home’s vulnerability to earthquakes.
Research fault lines and topography
First, research your home’s location to understand how proximity to fault lines and other natural features could influence the severity of an earthquake’s impact. Dr. Jensen also recommends reaching out to the city, county, or state’s emergency management agency for a detailed risk overview.
“Up in Seattle, for example, you could contact the Emergency Management Agency. They’ll have excellent hazard maps and they’ll be able to help you understand the particularities of the area you’re going to be living in,” Dr. Jensen shares.
The state’s department should be able to provide detailed information on your locality at a granular level, such as how an earthquake (or other natural hazards) could affect your individual property. To find out the name and contact information of your state’s emergency management agency, type your ZIP code into FEMA.gov’s location search tool.
Bring in a structural engineer
When you purchased your home, you may have received some information on the property’s vulnerability to earthquakes from the seller’s disclosure forms and the home inspection findings. Poppa shares that in earthquake-prone areas, a qualified home inspector will recognize signs of earthquake damage, as well as point out if a property should be retrofitted to meet current earthquake safety codes.
If the home inspection indicated any signs of earthquake risk, reach out to a structural engineer for a closer look. For around $300 to $400, the engineer will perform an assessment and suggest cost-effective ways to bring the house up to speed.

Understand why building age matters
Earthquake related building codes have evolved tremendously in the past 100 years. If your home was built before the most recent wave of codes, you may want to retrofit the structure to improve safety.
A brief history of seismic codes
In the U.S., the first earthquake building codes were published in 1927, when volunteers from the Structural Engineers Association of California (SEAOC) developed earthquake design requirements in cooperation with the International Conference of Building Officials (ICBO).
In the following decades, SEAOC, along with sister associations in other states, revised these seismic codes by studying structural damage and resistance resulting from earthquakes across the country.
In 1971, a magnitude 6.6 earthquake hit Sylmar, California, a community located just north of Los Angeles, resulting in extensive damage to many modern code-conforming structures. The event revealed a need to bolster standards previously deemed adequate.
In response, Congress passed the Earthquake Hazards Reduction Act and established the National Earthquake Hazards Reduction Program (NEHRP) to develop effective ways to mitigate earthquake risks.
In 1985, NEHRP released a guidance document containing much of today’s standard seismic building codes titled NEHRP Recommended Provisions. International Building Code adopted the document in 2000, making these seismic codes standard for all U.S. states and territories.
Retrofit your home accordingly
If your home was built before 2000, you may need to retrofit your building’s structure to maximize its resistance to earthquakes.
Before the implementation of today’s sophisticated seismic codes, houses were primarily built to resist vertical loads, namely the weight of the house, interior contents, and snow on the roof — gravity essentially. In an earthquake, the ground moves in a linear direction, placing lateral loads on the house. Older homes not reinforced to handle lateral loads dissemble under the shifting weight, sliding off the foundation and support beams.
For an impactful case study, take a look at these side-by-side Napa homes that were hit by a magnitude six earthquake in 2014; the retrofitted home was virtually unharmed, while the other home shifted under the unmanaged lateral loads.
There are three primary ways to reinforce an older home:
- Anchor the mudsill to the foundation: Before the 1950s, mudsills — the wood on top of the foundation — were not bolted to the foundation. Bolting the house to the foundation prevents the house from sliding off in the event of an earthquake.
- Brace cripple walls: Cripple walls are short walls that rest on a house’s foundation and support the floor and exterior walls in the front-to-back direction. In a retrofit, cripple walls are insulated and braced with perpendicular structural plywood shear panels that brace the house in the side-to-side direction.
- Install shear transfer ties or framing clips: For greater structural integrity, shear transfer ties or framing clips are installed between the cripple walls and the first floor to reinforce the connection.
Cost of retrofitting
According to HomeAdvisor, the average cost to retrofit a home ranges between $3,314 – $7,022. In instances where a home only requires foundational bolting, the average cost is even lower at $3,000. The retrofitting process takes around a week to complete with minimal disruption to the homeowner since most work occurs in the home’s crawl spaces.
The cost to proactively retrofit your home is minuscule in comparison to the potential cost of damage repairs if left as is. In the case study above, the owner who did not retrofit their home faced repair bills surmounting to hundreds of thousands of dollars and were unable to rent the home for over two years until such repairs were complete, according to the Los Angeles Times.
Since collective property damage in the event of an earthquake stretches state resources, some government municipalities offer grants to encourage homeowners to retrofit their homes. In California, the California Earthquake Authority (CEA) offers qualifying homeowners a premium discount of up to 25%.
Reinforce your home’s structural weak points
Homeowners with older and newer houses alike should reinforce these notorious weak points:
Windows
There are a couple of options to earthquake-proof your windows and prevent them from shattering from the ground movement. The most affordable option is to apply safety film to strengthen the glass and hold it together if it breaks; homeowners can apply the film themselves for $3 to $4 per square foot. For even more protection, replace large windows and sliding doors with tempered or laminated glass for an average cost of $10 to $20 per square foot.
Garage
Contractors refer to a room above the garage as a “soft story” since it has soft resistance to earthquakes given that the wall with the garage door is not as supportive as the others. To earthquake-proof your garage, reinforce the garage door wall with steel or plywood on either side. Remember to keep storage units away from windows, so no glass breaks when the units rattle during the earthquake.
Roof
When the time comes to tackle a roof repair, consider replacing your roof with a light, earthquake-friendly material such as aluminum, wood, or asphalt, in contrast to heavy brick or terra-cotta. The lighter the roof, the less force it exerts onto your home’s support system, decreasing the probability of collapse.
Brick chimneys
During earthquakes, brick chimneys cause significant damage as toppled bricks become projectiles, harming structures and people in their path. According to the California Earthquake Authority, the 1994 Northridge earthquake in California, at least 15,000 brick chimneys were damaged. More recently in the 2014 Napa earthquake, about half of the residential buildings damaged were due to brick chimneys.
Retrofit your brick chimney with one of the following options:
- Cap the chimney to roof height: By removing the extended portion of the chimney, you eliminate the risk of the chimney toppling. While this is the most affordable option, capping the chimney eliminates fireplace use.
- Reconstruct the top of the firebox: Maintaining the brick base, replace the upper portion of the chimney with siding, stucco, or adhered brick veneer.
- Reconstruct the entire chimney: Replacing the entire chimney with a lighter material is the most expensive route, but is also the safest. As with the previous option, you can design the exterior with siding, stucco, or adhered brick veneer.
Install earthquake safe home systems
In the event of an earthquake, damage to your home’s water, gas, and heating and cooling systems can result in further damage to your property. Invest in upgrading to the latest technology to eliminate these risks.
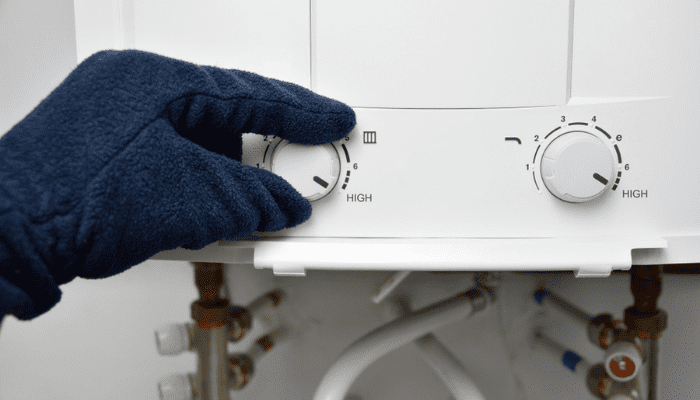
Tankless water heater
The typical residential water heater weighs between 450 to 500 pounds when full, making it a potentially lethal object in the event of an earthquake. The Uniform Plumbing Code requires water heaters in seismic zones 3 and 4 to be double strapped for safety, though there’s an even safer alternative:
“A lot of people are moving over to the tankless water heaters which are a lot safer. There’s just less risk of it falling and it damaging your house and flooding the whole thing,” shares Pompa.
The cost of tankless water heaters varies widely, starting at as low as $170 for a small gas-fired unit to $2,000 for a high-output model. Consult our guide to the pros and cons of tankless water heaters for additional details.
Earthquake natural gas shut-off valve
An earthquake natural gas shut-off valve, also known as a seismic natural gas shut off valve, automatically blocks your natural gas line when an earthquake of a sufficient magnitude occurs. Socal Gas estimates that the average cost of the device plus installation runs between $2,500 to $5,000.
Secured HVAC system
Secure your HVAC unit to prevent damage to the unit and your family if a gas line or refrigerant line leaks in your home. Install a vibration isolator under the unit connected by restraint brackets to absorb movement. You can also reinforce the condensate and gas lines with flex-line piping, covering these rigid pipes with a flexible backup in case they break from ground vibrations.

Keep earthquake safety in mind when decorating
Earthquake proofing your home’s interior is just as essential as reinforcing its surrounding structure. Not only will this preparation protect your belongings, but it’ll also reduce the risk of injuries among your household members. Dr. Jensen explains the importance of this “non-structural mitigation:”
“A lot of injuries occur after an earthquake where people are trying to clean up, and they get cut or they fall, and they have soft tissue injuries and that sort of thing. A lot of these injuries aren’t necessarily in the initial shock but come afterward. [People are] in too much of a hurry to get back to normal when really they need to slow down and be careful.”
The following earthquake-proofing checklist can help secure your home’s contents while the earth’s moving. Best of all, you can complete this checklist with a small budget in just a weekend’s time:
- Ensure all hanging items including pictures, artwork, mirrors, and televisions are bolted into wall studs. You can purchase a stud finder for less than $10 at hardware stores like Home Depot.
- Replace picture hooks with earthquake-safe hooks to prevent them from bouncing off the walls in an earthquake.
- Stick the bottom corners of decorative items, vases, and lamps to shelf and table surfaces with a reusable adhesive product such as Quakehold!, Museum Wax, and Blu-Tack.
- Bolt large items such as bookshelves and dressers to the walls with metal “L” brackets or specialty earthquake safety straps.
- Safely store flammable liquids in a well-ventilated area away from possible ignition sources such as electrical appliances, furnaces, and lamps.
- Store fire extinguishers and fire blankets in readily accessible areas.
Weigh the pros and cons of disaster insurance
While most standard home insurance policies do not cover damage due to natural disasters, homeowners may purchase complementary disaster insurance to cover repairs, personal property, and loss of use (hotel expenses) resulting from an earthquake.
The average cost of earthquake insurance is $800 per year, though the price varies based on factors such as ZIP code, property value, property age, distance from fault lines, and home material. For instance, in California, the average cost to insure a single-family home runs significantly higher, between $1,248 to $2,744 annually.
Considering the average price to retrofit a home is $3,314 – $7,022, earthquake insurance may cost more than it’s worth for many homeowners.
“Everybody has to work that out on their own and just be informed, careful consumers of all these products,” Dr. Jensen comments. “So just understand the risk, understand the tolerance to the risk, what they want to live with, are they better off putting the money into mitigating the house, making it stronger.”

Create an emergency plan for your household
Once you earthquake-proof your home, devise an emergency plan to prepare your household for an earthquake.
“We realistically need to plan for being on our own for two weeks because the supply chains are so complex supporting these cities. So having water, having food, having first aid — just being able to get by for a very extended period is an important thing,” Dr. Jensen advises. (He adds that families should agree on a plan for if an earthquake strikes while everyone is out of the house as well.)
Here are a few tips to help your family prepare for an earthquake; for a more comprehensive list, visit the Red Cross’ Earthquake Safety webpage:
- Maintain a survival kit in your home with basic supplies including water, non-perishable food, flashlights, first-aid kit, battery-powered or hand-crank radio, and copies of important personal documents.
- Keep emergency supplies in your car including a first-aid kit and enough food and water for a few days.
- Download the Red Cross earthquake app to receive a notification when an earthquake occurs, find help, let others know you’re safe, and access pre-downloaded resources even without mobile connectivity.
Proactively earthquake-proofing your home gives you power
When you earthquake-proof your home, you put yourself in a position of power when an earthquake strikes your community. You reduce the risk of property damage, the chance of family members getting injured, and the need to rely on government support services which may be inundated.
“We’ll be just fine in an earthquake,” shares Dr. Jensen, whose own home is as earthquake-proof as could be. “We may have damage at worst and the area around us might have problems, but we’ll be in a position where we can contribute to recovery in our community. We can thrive afterward. Planning ahead means we don’t have to be victims.”
Header Image Source: (divanov / Shutterstock)
At HomeLight, our vision is a world where every real estate transaction is simple, certain, and satisfying. Therefore, we promote strict editorial integrity in each of our posts.
