Dark Wood Be Gone! Painting Your Trim White, Step By Step
- Published on
- 5-6 min read
-
 Christine Bartsch Contributing AuthorClose
Christine Bartsch Contributing Author
Christine Bartsch Contributing AuthorClose
Christine Bartsch Contributing AuthorFormer art and design instructor Christine Bartsch holds an MFA in creative writing from Spalding University. Launching her writing career in 2007, Christine has crafted interior design content for companies including USA Today and Houzz.
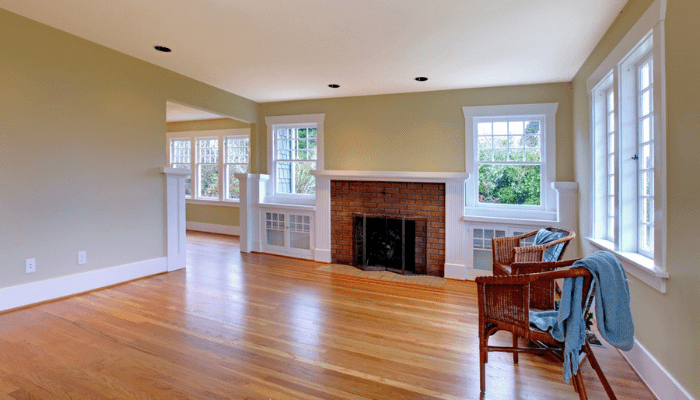
If you’re on a tight budget but seek to modernize your home with some elbow grease and DIY prowess, painting your trim white could be a great project to tackle. For approximately $200-$600 in supply costs and a weekend’s worth of work, white paint will instantly transform the dark trim common throughout homes built in the ’70s and ’80s and brighten each room by reflecting natural and artificial light.
“We’ve seen an increase in homes with white trim since around 2015,” shares Hao Dang, a top real estate agent in the Seattle area. “Homeowners are painting all of their woodwork white to brighten their rooms, including millwork, doors, kitchen cabinets, chair rails, window and door trims, and baseboards.”
However, painting your trim requires a higher skill level than painting your walls, as you’ll need to prep and sand the trim before you apply the fresh color. To help you avoid mistakes while saving money on labor costs, we’ve put together this step-by-step guide for painting your trim white. Read on for a handy supplies list, color recommendations, and clear instructions for each part of the process.

1. Make a plan before you paint
Trim dates as far back as the Renaissance with variations found in Italian, French, English, Hispanic, and American architecture. Historically, trim has been from carved wood or molded plaster. There’s no precise date as to when painting trim white came into fashion; however, its origins trace back to the advent of open-concept contemporary homes and minimalism in interior design. Before you go all-out with the white paint, make sure the style will align with other factors such as the color of your walls and the age of your house.
Assess your wall color and contrast
White trim on white or light walls will blend together as one. If you’re going for function and neutrality rather than decoration, this white-on-light look could work. But if you’d like a bit more contrast against white or cream-colored walls, explore the dark trim trend which uses blue or teal color hues.
White trim also pops nicely against darker hues like a steely gray. The contrast highlights both the architecture of the space as well as the contours of carved trim like crown molding. But white trim doesn’t work with every wall color. For instance, a beautifully pale, dusty rose takes on a more immature baby pink look when set off by white trim.
Virtually paint your rooms first
When you’re undecided about whether white trim will look right in your room, turn to an online color visualizer. Many paint companies and home improvement stores have developed these tools to allow customers to see how different hues look when paired in a room. Some even allow you to upload photos of your own spaces to try out different paint samples. Here are a few to try from well-known paint brands:
- Sherwin Williams: Color Visualizer
- Glidden: Room Visualizer
- PPG Paints: Color Visualizer
- Benjamin Moore: Personal Color Viewer
- Behr: ColorSmart Color Explorer
Consider your lighting
While these color visualizers can give you a general idea as to whether you like white trim paired with your chosen wall color, they do not account for how natural and artificial light will impact the paint colors in real life. Should you find that your wall color won’t work well with white trim, consider painting the trim the same shade or a shade darker than your wall color to help it disappear.
Take special care with a historic home
Check out any online historic house enthusiasts group, and you’ll find a white trim debate raging between those for and against white trim. Those in favor of the trend argue that the small rooms and windows of historic homes — and the closed nature of their floor plans — make historic homes dark and gloomy. They believe painting dark wood trim white brightens up those rooms without installing larger windows or removing the dark woodwork from the house.
Those against painting trim white in historic houses declare that painting over wood trim that’s hand carved destroys its value and creates a massive restoration job for future owners who want to return it to its original state. They assert that trim and millwork in historic houses is often made from expensive wood like oak, whose beauty would be hidden below the paint.
Consult with a real estate agent
Owners of historic homes struggling with this decision should reach out to a real estate agent working in their neighborhood.
“In Seattle, whether or not you paint trim white in a historic home depends on the age demographics of the buyers in your area,” explains Dang. “Buyers in their 20s to 40s tend to prefer trim painted white because it brightens and modernizes the home, especially because historical homes tend to be darker and more closed in than modern, open floor plan homes. However, buyers in the 50s and 60s are more inclined to prefer leaving wood its original color to preserve its historical charm.”

2. Gather your supplies
You’ll need quite a few supplies to paint trim, most importantly — paint. Here are a few tips to determine what type of paint to select and how much to purchase before you begin this project.
Calculate how much paint you’ll need
How much paint you’ll need for your trim depends on how many linear square feet you’re painting, including doors and chair rails. You may need as much as several gallons if you’re painting the trim throughout the entire house. Semigloss or high gloss paint averages between $30-$120 per gallon, depending on the brand.
To calculate how much paint you need, add up the length and the width of the trim separately, then multiply length times width to get your square footage. Since it takes around one gallon of paint to cover 400 square feet with one coat, divide the square footage by 400 to determine the number of gallons you’ll need.
For example, if you have 500 square feet of trim to paint, you’d need 1.25 gallons (500/400) of paint for the first coat. For a second coat, which is often recommended with trim, you’d need 2.5 gallons of paint.
Pick your preferred shade of white
There are hundreds of shades of white to choose from for white trim. Picking the right one depends on the color of your walls and the lighting conditions of the space. Keep in mind that white not only reflects light, it’ll reflect a bit of the color of your walls and floors, too.
For example, if you’ve got red walls and coppery wood floors, a creamy white trim may take on a peachy hue, rather than appearing purely white or cream. When in doubt about your color sense, it’s best to do your paint shopping at a brand-name paint store, who employ color experts to help you pick the right shades of paint for your space.
For homeowners more certain about their color selecting skills, save a little money by shopping at home improvement or hardware stores. Their employees are experts at mixing paint, however your paint mixer may not be an expert at choosing colors.
Here’s our top paint picks for white trim:
- White Dove – Benjamin Moore
- Gypsum – Glidden
- Snowbound – Sherwin William
- Whisper white – Behr
Go with a durable paint finish
No matter the shade of paint you choose for your trim, you need your finish to be either semigloss or high gloss, especially on the baseboards. “Baseboards tend to get more scuffed up than other areas, so you definitely need at least a semigloss paint because it’s a bit more durable,” advises Dang.
Grab the rest of your supplies
In addition to paint, here’s a list of what you’ll need to complete this project at home:
- Large household sponge – $3.50
- Wood filler (optional) – $6.50
- Putty knife (optional) – $1
- 120-grit sandpaper – $13
- Tarp or drop cloth – $11.50 OR Masking paper – $5 per roll
- 1.88 inch Painter’s tape – $3 per roll
- Detail squeegee – $3
- Paint stick – usually free with paint purchase
- Paint tray – $3
- Two angled sash paintbrushes; a 1-1/2-inch and a 2-1/2-inch – $1-2 each
Make sure you have all of your supplies before you begin. If you’re painting the trim white throughout your whole house, be sure to have plastic wrap handy. Rather than clean your paintbrushes and paint tray between each painting session, you can cover them tightly with the plastic wrap to keep the paint from drying out.
3. Clean your trim for a fresh slate
Your trim must be completely clean of dirt and dark scuffs. Dust and dirt will pill in the paint, making it gritty, while dark scuffs will show through a single layer of white paint. Use the household sponge and water if you only have light dust and scuffs.
Add a few tablespoons of laundry detergent to the water if you have tougher dirt marks to get rid of. If you have a lot of black rubber scuffs on your baseboards, try using a Magic Eraser melamine sponge to remove them.
Also scrub down the 2- to 3-inches of walls and floors around your trim where you’ll run your tape to mask off your trim. If these areas are dirty when you run your tape, they’ll lift off while you’re working and allow leakage.
4. Fill in nicks and nail holes
Check your trim for any nicks or dents that have accumulated from natural wear and tear. If you are installing new trim, you’ll need to fill in those nail holes as well. Use the wood filler and putty knife for this task.
On older houses, trim may lift away from the walls and floors over time. If you notice any cracks along your trim, you’ll need to caulk these cracks before painting.
5. Sand surfaces
Existing stain or paint on your trim will add a slickness to it either from the paint gloss or the wood sealer. This top layer needs to be sanded down before you apply any paint, or your fresh coat of color will not adhere properly.
If your trim and baseboards are in good shape, you’ll only need to lightly sand the surfaces with 120-grit sandpaper to take off the sheen. However, if your trim is in bad shape, with lots of visible paint drips or brushstrokes, then sand them first with an 80-grit, then a 100-grit, before finishing with the 120-grit sandpaper.
If you’ve had to fill in any nicks or nail holes with wood filler in the previous step, you will definitely need to sand over those areas with an 80- and 100-grit sandpapers first to clean off any excess — even if the rest of your trim is in good enough shape to need only 120-grit sandpaper.
Run a damp, clean sponge over all sanded trim to remove any excess grit. Do not start taping off your trim until it is completely dry or you won’t get a proper seal, and paint will leak under the tape.

6. Mask off all trim with tape and tarp
Move all furniture away from your painting areas and start taping along the edge of all of your trim. Tape off approximately 6-inches at a time to ensure that you get as straight a line as possible.
As you tape, press it into place using the detail squeegee to create a tight seal and to remove any air bubbles (otherwise you’ll have pockets in your tape where paint can seep in). If you have a plastic putty knife, you can use that in place of the detail squeegee.
Do not use a metal putty knife to press down tape as the thin metal blade can cut, scratch, or gouge the tape — and may damage your trim as well. Once the tape is in place, spread out your tarp or masking paper and tape it into place.
Now, if you have carpet, you have a few options for painting your baseboards depending how the room came together. You can paint with the carpet in place so long as the baseboards were installed with a gap between the baseboard and carpet. If that’s not the case, you’ll likely need to either remove the carpet and reinstall it after you paint, or peel the carpet back. If this sounds out of your DIY comfort zone, consider hiring a professional to at least handle the baseboards.
7. Start painting!
You’ve cleaned, sanded, and taped — and now you’re ready for the good stuff. Let’s paint that trim!
Don’t forget to prime
If you are painting over wood trim that is new and raw, or has previously been stained, you will need to apply a coat of primer first, then wait 24 hours before applying the white paint.
If you are adding a fresh coat of white paint to already-painted trim, you can skip the priming step. However, if you used wood filler excessively, or you’re painting over a dark color, you’ll need to use that primer for smooth and bright results.
Use best painting practices
When you’re ready to paint on your choice of white, open up your paint and stir it thoroughly with the paint stick to ensure that the tint is properly mixed in. You should do this each time you add more paint to your tray.
Pour a portion of your paint into the painters tray and close the can. This prevents your paint from drying out or spilling. Dipping your brush out the tray rather than the can helps to prevent drips. Use your 2-1/2-inch sash brush for faster coverage of wider trim and your 1-1/2-inch for narrower trim and detail work.
Dip about 1-inch of the tip of your sash brush into the paint in the tray and wipe away any excess using the grooves in your paint tray. Start painting a few feet of your trim at a time using multiple short strokes to get full coverage. Refill your brush with paint as needed.
Put on your finishing touches
When you have covered a section of trim with white paint, run your brush along the still-wet paint in one long stroke to smooth out any visible brushstrokes. Repeat this process until all of the trim you planned to paint is nicely covered!
Let it dry!
Do not remove tape until your paint is completely dry. Check the information on your paint cans for approximate dry times and when it’s safe to re-coat. Once you’ve applied all coats, run your putty knife lightly and carefully along the edge of the tape and the trim. This will break the connection of any paint that’s overlapped onto the tape so that you will not pull off any of the paint on your trim when you pull off the tape. Then you’re ready to remove your tape.
White trim for the win — if you can muster the energy
We won’t sugarcoat it: Painting the trim around your house requires some extra steps that aren’t required when you’re painting a regular wall. In addition, painting trim involves repetitive, detailed work that can leave your arms and wrists tired. That said, you can save a lot of money by DIYing this project.
It’s estimated that painting all the trim in a 1,500 square foot home could cost up to $1,500 on the high end. When you tackle the labor yourself, you’ll only have to account for the costs of supplies at the hardware store. You’d be amazed what painting your trim white can do to bring a 30 or 40 year old home with dark, dated finishes into the current century where light and bright is the dominant preference.
Header Image Source: (VH-studio / Unsplash)
At HomeLight, our vision is a world where every real estate transaction is simple, certain, and satisfying. Therefore, we promote strict editorial integrity in each of our posts.