
How to Add Curb Appeal With Just One Weekend of Hard Work
- Published on
-
 Christine Bartsch Contributing AuthorClose
Christine Bartsch Contributing Author
Christine Bartsch Contributing AuthorClose
Christine Bartsch Contributing AuthorFormer art and design instructor Christine Bartsch holds an MFA in creative writing from Spalding University. Launching her writing career in 2007, Christine has crafted interior design content for companies including USA Today and Houzz.
Pesky weeds, cockeyed house numbers, scraggly hedges and trees—these are all signs your curb appeal is in desperate need of some TLC. Obvious neglect on the outside will scare away your best buyers before they even open the door.
That’s why 94% of Realtors recommend amping up your home’s exterior before your home hits the market.
But when you’re planning to sell, you don’t want to spend more than a single weekend (seriously, we’re talking 48 hours) to effectively whip your curb appeal into shape. Time is of the essence!
Enter this game plan for how to add curb appeal—crafted with the expertise of top real estate professionals who get insider feedback from real buyers every day. We’ll cover the big jobs (and a lot of the little ones in between) to prevent missteps that would throw a wrench in your done-in-one-weekend plan.
Aim For Attractive, Not Perfect, Curb Appeal
Angela Fox, a Denver-based real estate agent who ranks in the top 1% out of 14,046 agents, explains:
“Any time I go over to meet with the seller, they have a Santa’s scroll list of things that they think needs to be done to the house—it’s item after item. And I explain, ‘You guys live in the house and notice every little thing, but we need to think big picture and look at it from the buyers’ perspective.’”
The big picture is this: buyers want to buy attractive properties, not perfect properties.
Think of it this way: When you first bought your house, you spent time and money making the house’s exterior look like the home of your dreams. Buyers want to do the same—changing things to fit their wants and needs.
Instead of spending cash and effort trying to achieve exterior perfection, you simply need to tidy things up so buyers can see its potential. And if your home’s front yard is already in OK shape, that can be accomplished with one weekend’s worth of hard work.
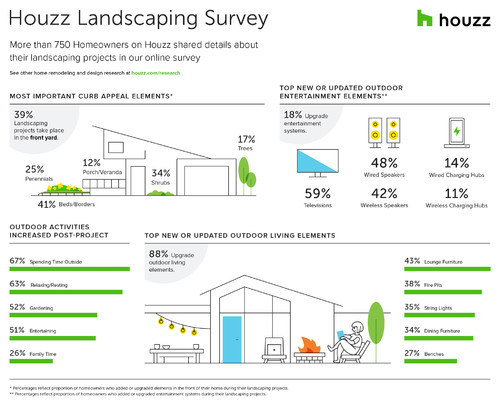
The trick to figuring out how to improve your curb appeal in just one weekend is as simple as looking at the data. A landscaping survey by home design site Houzz found that improvements to foliage make the biggest aesthetic impact to curb appeal.
But trimming existing foliage and planting new flora isn’t the only way to improve curb appeal quickly.
Washing off the effects of weather from your roof, windows, and siding will also make the place sparkle. Add a few tasteful, strategically placed accessories and you’ll have your home’s front yard looking like the winner of a reality TV show.
Let’s get to it.
Day 1—Morning: Trim Foliage, Pull Weeds, and Inspect the Landscape
Morning Supplies List:
- Tree trimmer (Amazon, $55.60)
- Hedge trimmer (Amazon, $29.99)
- Irrigation marker flags (Home Depot, $2.37 for a 10-pack)
- Tape measure (Lowes, $5.98)
- Weed control spray (optional—Home Depot, $14.97)
- Notepad and pencil (grab one from around your house!)
It’s backbreaking work to trim all your plants and pull weeds all at once, so you want to get it done first thing on the first day—especially before the sun gets too hot.
Doing so will also prevent any falling debris from messing up a newly-mown lawn or freshly planted flower bed. This is also why you trim from the tallest to the smallest, so falling tree branches don’t smash a just-manicured shrub.
Since you’re likely no landscaping expert, don’t expect an Edward Scissorhands-worthy result. You just want to trim away any obviously dead branches and wild offshoots.
Since you’re selling, now’s a good time to think ahead to the home inspection and trim plant growth away from the house by 10-12 inches (with your handy tape measure) to meet standard requirements.
Work neat—so you don’t create more work for yourself later—by tossing your trimmings in the same piles (or piles if your greenery is spread out). Just don’t waste too much time picking up every little twig as you trim. You’ll rake up that debris later.
Once you’re done with that, hit the lawn and get to pulling up all unsightly weeds. If yours tend to grow back fast, hit each spot with the weed control spray so you won’t be back out there again in a week or two.
While you’re weed pulling, also remove any stones or other debris that might damage your lawn mower. Mark those that are too big to remove with a marker flag (and mark your sprinkler heads, too) so you can mow around them.
If you have a grass-free front yard—like gravel, mulch, artificial turf or an English garden—use those flags to mark problem areas to fix up later. For example, older gravel yards get bare spots and artificial turf can get loose over time.
As the morning work winds down, take a step back and take note of any areas where your curb appeal needs work. This includes things like neglected, undefined flower beds, to dead, patchy grass spots under trees.
Those negatives can easily be transformed into positives with a few smart accessories—if you know what you need.
Pull out your tape measure and measure everything about those unattractive areas. You’ll need to mark down the length and depth of that bare spot under the tree, the circumference around each flower bed, all of it.
Those specifications will help you pick out the perfect outdoor accents to fill them later.
Day 1—Afternoon: Scrub Your Home Exterior Until It’s Sparkling Clean
Afternoon Supplies List:
- Ladder (Lowes, $86.85)
- Industrial broom (Lowes, $37.48)
- Roof safety harness (Home Depot, $99)
- Gutter scoop (Lowes, $3.98) OR gutter guard brush (Home Depot, $9.97)
- Garden hose (Lowes, $29.97, if you don’t already have one)
- Garden hose nozzle (Lowes, $9.98)
- Window squeegee (Home Depot, $19.97)
- Old towels from around the house
- Pressure washer (Home Depot, $99, optional) and low-pressure nozzle (Amazon, $6.35)
You’re now ready to clean up your roof, gutters and siding. This cleaning comes after the greenery manicuring for two very important reasons. One, you won’t have to go back to pick tree trimmings off your freshly clean house. And two, foliage near the house will get wet—and wet shrubs are messier and more difficult to trim.
Using the same top-down work plan (as the tall to small trimming), sweep the roof clean of leaves and other debris with the industrial broom, while wearing your roof safety harness.
Sweep from the top down to the edge—following the direction your roofing is laid—so you don’t accidentally damage your roofing or pull up tiles. If you live in an area where roof moss is an issue, this may require more extensive cleaning and treatment, so don’t try to tackle that now.
If you’ve got gutters on your home, now is the time to clean them out, or you risk getting docked during the home inspection. Remove old leaves and other debris with your gutter scoop, or brush clean your gutter guards with the guard brush.
Once you’ve removed the main debris, run water through your gutters to rinse out any remaining dirt and leaves. And check that your downspouts drain away properly from your foundation (another pre-home inspection fix to save you time later).
After the gutters are clean, attach the nozzle to your garden hose and spray your siding, windows and eaves—again working top to bottom. Most exterior dirt will wash off easily with just your regular water pressure.
For tougher, stuck-on messes, using a pressure washer is an option. However, you run the risk that the high pressure will damage your siding. High pressure water sprays can dent aluminum siding, crumble stucco, and even shred bricks.
If you are going to pressure wash, take the proper safety measures.
Consumer Reports recommends a 40° angle or a low-pressure nozzle for easily-damaged surfaces like wood or stucco. Experts also advise keeping the nozzle at least six inches away from the surface.
While the windows are still damp, whisk the water away with the squeegee to prevent water spots. Wipe the squeegee dry with the old towels in between each stroke to avoid streaks.
As you’re cleaning, take time to consider the impression your front door makes. Look at the condition of your house numbers, your mailbox, any conspicuously empty spots.
Fox says, “With curb appeal, we really focus on the front door. I always say that I can tell from the front door how the rest of the house will look. A lot of homeowners never use their front door, so they don’t really know what the front door space looks like.”
This is the spot where potential buyers will get their first, up-close impression of your home, so the front door needs special attention.
Day 1—Evening: Shop for Curb Appeal Boosters
Morning Supplies List:
- Notepad with measurements
- Tape measure
Now that you’ve done the bulk of the labor-intensive work, relax and assess the places in your front yard that most need a curb appeal boost. Rank them in order from most to least important so you know which ones to skip if you run over budget.
As you head out to the home improvement store, make sure to bring your tape measure and the notepad containing the measurements you took in the front yard. Otherwise you might end up buying items too big or small for the areas you need to fill.
It’s also a good idea to measure how much space you have in your vehicle, so you don’t wind up buying more than you have room to transport in one trip.
Of course, you can get this shopping done prior to your work weekend. However, doing it on the day of means you’re more familiar with what your front yard actually needs.
Shop from most important to least important (according to your list), so that you don’t run out of room in the budget, or in your vehicle. So if potted plants for the front door top the list, get the flowers, pots, and potting soil first.
For those planting both potted plants and in-ground flowers, make sure you get the right soil for each task. Container gardens require potting soil, while in-ground beds require garden soil.
If you’re buying new house numbers or a mailbox, remember that the siding underneath is likely to be less weathered. So your replacements need to be the same size or slightly larger so the old outlines don’t show.
Along with flowers for your beds, consider adding edging to give them eye-catching definition. While picking a border that complements your home’s siding is important, factor budget and ease of installation into your decision as well.
That bare lawn eyesore under the tree in your front yard is easily transformed if you give it a purpose. For example, cover it with all-purpose gravel, add a decorative bench or birdbath, and that dead spot becomes an instant curb appeal booster. Pavers are an option to hide lawn blemishes, too, however, those are trickier to get level than gravel.
When you’re picking out decorative items like planters and benches, go for neutral design styles—even if you’re taking these exterior curb appeal items with you when you move.
If you pick a style that only suits your new home, you may ruin the curb appeal boost it should give to the house you’re selling.
Day 2—Morning: Debris Cleanup and Lawn Care
Morning Supplies List:
- Leaf rake (Home Depot, $24.97)
- Heavy-duty trash bags ($14.98, Lowes) OR paper lawn and leaf bags (Ace Hardware, $2.39 each)
- Weed eater (Home Depot, $69.97)
- Lawn mower (as a homeowner, you should already have one!)
- Soil tiller (Lowes, $26.98)
- Garden soil (optional, Home Depot, $7.97 per bag) )
- Industrial push broom (Amazon, $42.95)
Yesterday’s trimming and gutter cleaning probably created a lot of yard waste. However, some states have banned yard trimmings from landfills.
Check with your local waste management company and the U.S. Composting Council to find out the best way to dispose of yard waste in your area. For example, in some states trimmings must be collected in paper yard waste bags.
Once you know how to handle the trimmings, haul all of it off of the lawn with the help of your bags and the rake. At this point, you’re just removing all the bigger twigs and debris that your lawn mower can’t handle.

Next, mow the lawn, taking care to avoid the hazards marked by the flags. After your done with the bulk mowing, tackle the flag-marked areas with the weed eater.
Homeowners with lawn alternatives still have work to do to in their yards. Now is the time to secure artificial turf, spread fresh mulch, or rake your gravel.
Currently-bare flowerbeds need to be cultivated, so turn the soil with the tiller so that your fresh flowers can thrive. Mixing nutrient-rich garden soil in with the tilled earth will help your plantings survive and thrive throughout the whole home sale process. (Note: For those starting a flower bed from scratch, you’ll a more powerful electric cultivator to break up the sod.)
When that’s all done, sweep your walkway, driveway, and front door to remove all errant grass clippings, soil, gravel, or mulch. Finish up with one last thorough raking of the yard and bag up all debris.
Day 2—Afternoon: Add Curb Appeal Enhancers and Finishing Touches
Afternoon Supplies List:
Curb appeal boosters that you bought on day one
- Standard tool set (Home Depot, $22.91)
- Electric drill (Harbor Freight, $29.99, optional)
- Trowel (Home Depot, $7.97)
- Hand tiller (Lowes, $3.98)
After all the grunt work is done, have some fun decorating your front yard with the curb appeal boosters you picked out.
If you’ve kept to the plan, you should still have plenty of sunlight left to tackle any items that require assembly (bench, birdbath) or installation (mailbox, house numbers). In most cases, these items can be assembled or installed with a standard tool set.
Products that require specialty tools, like an Allen wrench (aka, a Hex Key), typically include one in the packaging. The electric drill comes in handy to speed up product assembly, as well as drilling new holes to install the house numbers or mailbox.
When you’re creating an impromptu gravel patio on your lawn, start by dumping the gravel in the center and spreading outward. If you’ve got a lot to spread, you may need a transfer shovel to get started.
Just don’t make the mistake of using your leaf rake to flatten the gravel out, or you’ll break the tines. If you don’t have access to a sturdy metal bow rake or a flat-edged shovel, use the flipside of your heavy-duty industrial broom (bristles skyward).
Spilled soil isn’t an issue when you’re working in a flower bed, but potting plants is surprisingly messy. Save yourself from needing to re-sweep by laying down garbage bags first.
Once everything is planted, assembled, and placed, step back and enjoy the impact of your curb appeal improvements.
Add Curb Appeal with Elbow Grease and the Right Game Plan
It’s a lot easier to read about adding curb appeal all in one weekend than it is to complete. You’ll definitely be exhausted when it’s done, especially if you attempt to tackle it alone.
Instead, enlist the help of family, friends, and even neighbors. After all, your improved curb appeal impacts the value of their homes, too.
People may not judge a book by its cover, but the moment your home hits the market, buyers are definitely judging it by its looks.
Article Image Source: (Artazum/ Shutterstock)
At HomeLight, our vision is a world where every real estate transaction is simple, certain, and satisfying. Therefore, we promote strict editorial integrity in each of our posts.