How to Stage a House from Top to Bottom: A Seller’s Guide to the Fundamentals
- Published on
- 5-7 min read
-
 Christine Bartsch Contributing AuthorClose
Christine Bartsch Contributing Author
Christine Bartsch Contributing AuthorClose
Christine Bartsch Contributing AuthorFormer art and design instructor Christine Bartsch holds an MFA in creative writing from Spalding University. Launching her writing career in 2007, Christine has crafted interior design content for companies including USA Today and Houzz.
Look up “staging” online and the first definition you’ll come across reads: “the method of presenting a play or other dramatic performance.” What’s that got to do with your home sale?
More than you think.
In film, TV, and theater, staging refers in part to the backdrop, props, and furniture that provide the setting where the actors will tell the story. And that’s exactly what you need to transform your home into: an attractive yet neutral setting where your future buyers will feel welcome to live out their own stories.
As lovely as that sounds, staging is a lot of work for strangers that you’ll only meet once, or not at all. That’s why we broke down the process for how to stage a house into manageable steps with ideas and inspiration to make every room look its best.
Staging a home for sale: What’s all the hype about?
The whole point of staging is to create a welcoming environment that showcases the house (instead of its current occupants) so that buyers can more easily envision themselves living there.
Sellers reap rewards from the process, too: staging helps homes sell faster and for more money, according to industry surveys.
In 2017, the National Association of Realtors (NAR) conducted a Profile of Home Staging and found that 31% of agents reported that their homes sold for 1% to 5% more thanks to staging, 13% said their homes sold for 6% to 10% more, and 5% indicated that their sold prices increased by 11% to 20%.

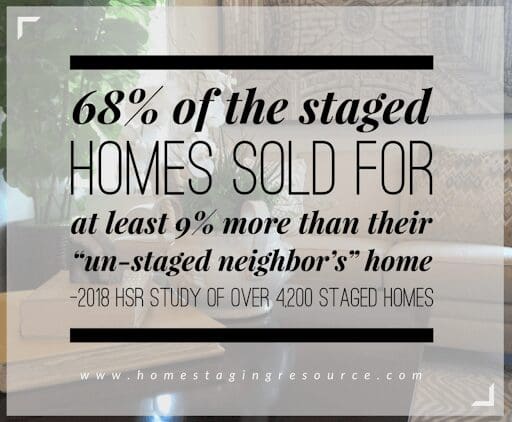
A more recent 2018 study conducted by Home Staging Resources compared the sold prices between staged homes and their nearby, “unstaged” comparables, and the results were striking.
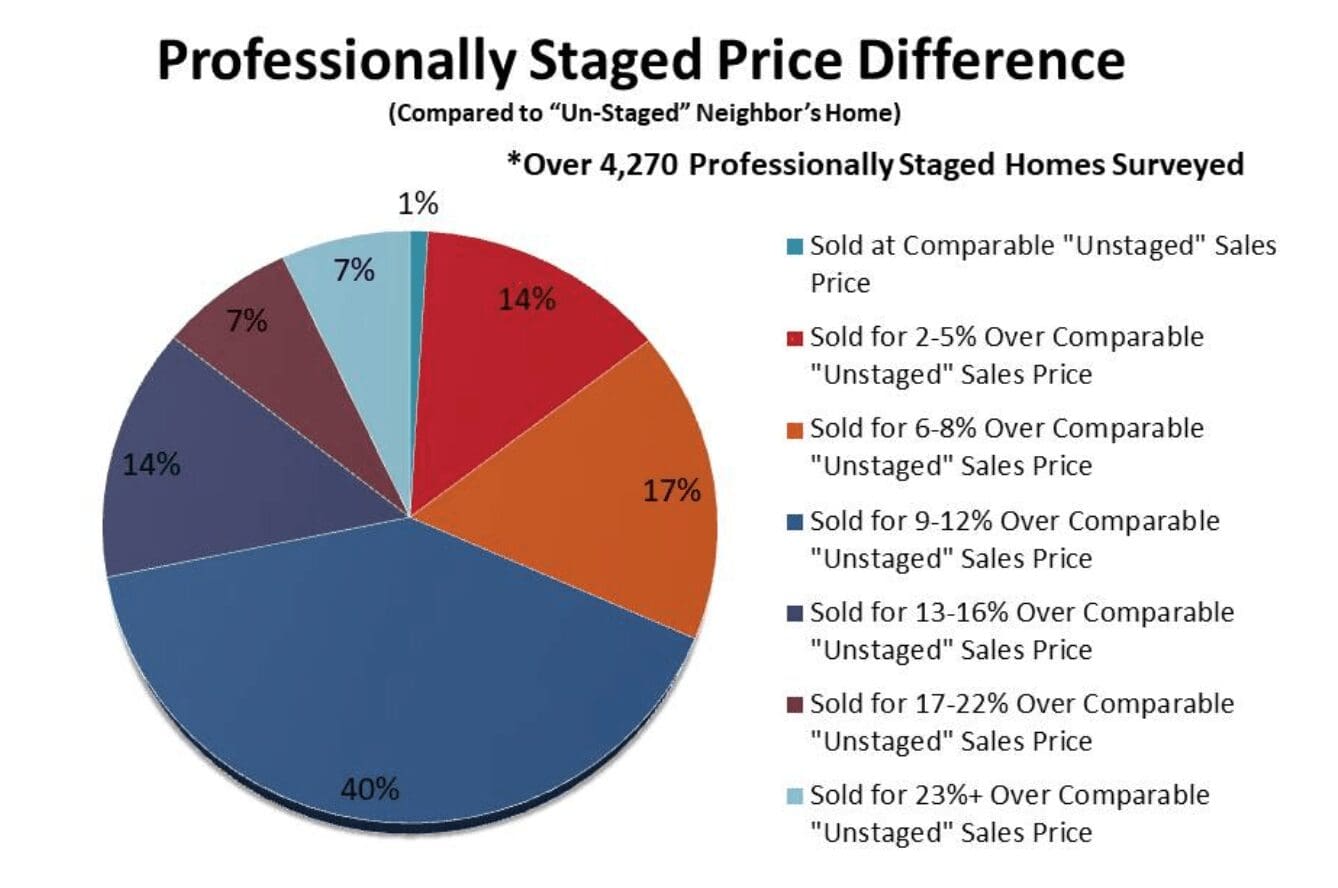
A grand total of 85% of all 4,200 staged homes surveyed sold for anywhere from 6% to 25% more than unstaged homes, with 68% of those selling for at least 9% more than “unstaged” neighbors.

So if you’re selling a home that would net you $300,000 unstaged—staging has the potential to net you an extra $15,000 on the low 5% end, all the way up to $75,000 on the high 25% end.
True, it’s more likely that staging will bring in up to 25% more on million-dollar luxury homes, but even on modest homes where staging only nets an extra 5%—that’s nothing to sneeze at.
Of course, staging only pays if it costs you less to do than you’ll make in profit, so let’s dive into a little crash course on how to crunch the numbers.
Do the math: How much will staging cost?
Do a quick online search of home staging costs and you’ll hear numbers anywhere from a reasonable $1,000 or two, all the way up to an alarming $8,000 to $15,000.
Those high figures threaten to eat up potential profit on your $300,000 home, but that doesn’t mean you should abandon the prospect of staging outright as there are ways to make staging affordable.
The dent staging will put in your wallet depends on three things:
- The size of your home
- How many rooms you stage
- Whether you hire a pro or DIY the staging yourself
You’ll mainly see those high-end staging prices given on massive, luxury homes where price is no object because staging will increase their sold price by $50,000 to $100,000 or more.
Staging a more modest home will cost closer to $1,500 to $2,500. That price often comes down by a couple hundred with referral discounts from hiring your agent-recommended professional stager.
“My stager is very good at knowing what to do with a limited budget and limited resources to choose from the homeowner’s belongings,” says Michael Winslow, a top-selling agent in Colorado Springs, CO who’s sold over 79% more properties than his peers.
Staging costs can be reduced even further by limiting the number of rooms you stage to just the living room, dining room, kitchen, and master suite (bed and bath).
Of course, the most cost-effective way to stage a house on a budget is to DIY the staging. True, you may not see the same amazing home sale price increases as you would if you’d let a pro do the work.
However, if DIY is all you can afford, it will still definitely help your home sell. And we’ve got just the DIY staging tips to help you get the job done.
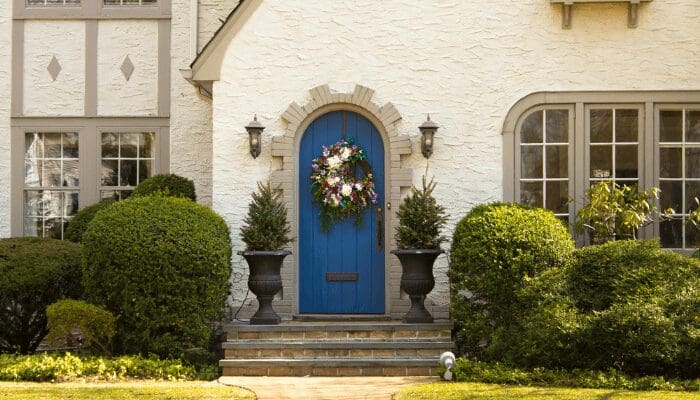
The outside counts: Staging starts with curb appeal
For starters, staging starts on the outside and in order to improve your curb appeal, you first need to make sure your exterior is sparkling clean.
This includes tidying up the landscaping, too. Unless you’ve got a brown thumb, there’s no need to hire a landscaper to tackle your foliage. Just don’t go so overboard trimming your greenery that the yard looks barren.
The next step is finessing your home’s first impression.
“A first impression is created when the buyers pull up to your home, and that impression will last in those buyers’ minds throughout the whole showing,” explains Winslow.
There are a lot of small, inexpensive ways to improve curb appeal that will refresh your home’s exterior without breaking the bank. For example, you can just paint the front door, replace your worn out doormat, or install a brand new mailbox.
Once the major work is out of the way, add a finishing touch pop of color with flowers that complement your home’s hue.
And the good news is, you can drastically improve your curb appeal in a single weekend.
3 steps of pre-staging prep: Decluttering, depersonalizing, and cleaning
No matter how carefully you arrange your furniture, buyers will never notice the great room flow if they have to wade through all of your junk, personal photos, and built-up grime.
So before you can set the stage for your buyers, you first need to clean, depersonalize, and declutter to make your living space as neutral as possible so it’s appealing to the buyer pool.
Decluttering is the first step recommended by most real estate agents, because it’s impossible for buyers to evaluate their interest in your house if they’re distracted by your belongings.
“Anyone who has lived at a home for more than just a few hours tends to create clutter. Drawers, closets, kitchen cabinets, things just stack up,” says Winslow.
“But when it comes time to sell a house, I tell my sellers, ‘Treat your home like a commodity and act like you no longer live there. Buyers don’t care about your memories, they just want a house where they can make their own memories.’”
You also need to depersonalize each space: remove any photos, memorabilia, and paperwork that’ll make buyers more focused on you than your home.
Once that’s done, you need to clean like the queen is coming over to visit—because if buyers start noticing dusty shelves, sticky floors, or spider webs in unused corners, they’ll start wondering if there’s hidden home damage lurking under the dirty surface.
Cleaning isn’t just about how your home looks, it also helps improve how it smells, too. But even deep cleaning isn’t enough if you’ve got tough odors to overcome, like pet scents. For that, you’ll need to do some deodorizing that attacks the root cause of the problem.
Set the stage for staging: A word on walls
Unfortunately, there’s only so much cleaning can do for the look of your walls. Though you may not notice it, walls build up a layer of grime over time that even the toughest scrubbing may not remove.
Add in all the natural fading, chips, scratches, scuffs, and scrapes that come from everyday wear and tear, and your walls are likely looking downright dingy.
Painting your walls gives you a fresh backdrop to showcase your staging efforts, especially if you choose one of these nine neutral colors.
Picking the right neutral hue for you starts with finding a shade that best complements the color of the furniture that’ll be in the room. For example, you can stay warm with beige walls behind a deeper tan sofa, or create a cool contrast between the couch’s warm tones and crisp white walls.
If color selection isn’t up your alley, don’t worry—just ask your expert agent what the current trends in wall colors are in your area.
Make every area a star: Staging tips for each room in the house
The real work of staging begins once the paint dries. While there’s a lot of good overall advice on how to DIY staging, it’s best to take things room-by-room to learn the best way to accentuate the assets of every space.
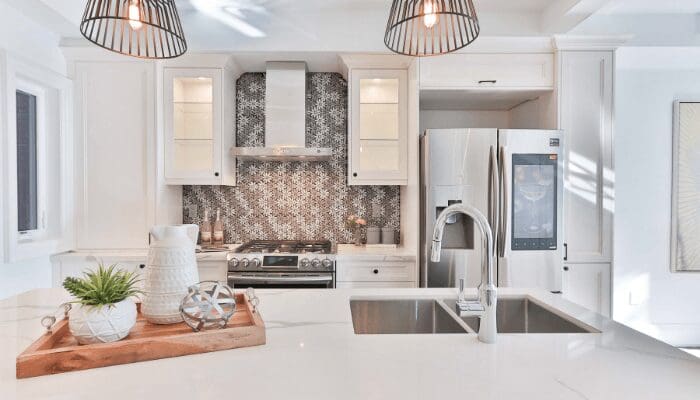
Kitchen staging: clear all surfaces, leaving only well-chosen accents
Staging a kitchen seems simple on the surface—because in the kitchen it’s all about the surfaces. Counter space is what buyers care about, so show yours off by keeping them well-scrubbed and cleared of clutter.
In the kitchen, only a few well-chosen final touches and accents should remain, such as a vase of eucalyptus, a kettle, and a small succulent.
When your cabinets are old or grungy, but you can’t afford to replace them, consider freshening them up with a coat of paint—just make sure the paint is designed to stick to kitchen grease-coated surfaces.
If painting your cabinets is still too pricey, you can still get a fresh new look by simply replacing the cabinet hardware, which includes the cabinet door hinges, handles, and drawer pulls.
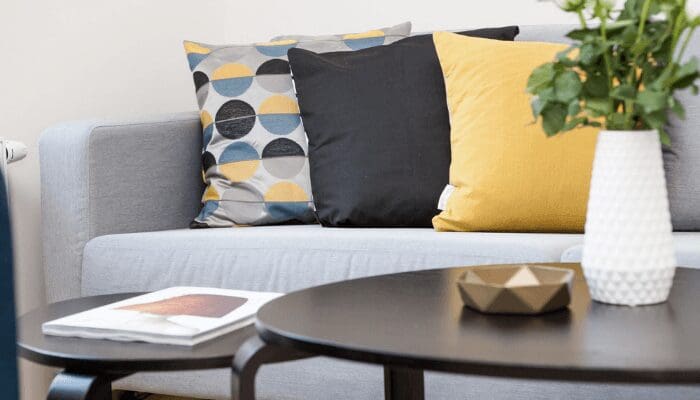
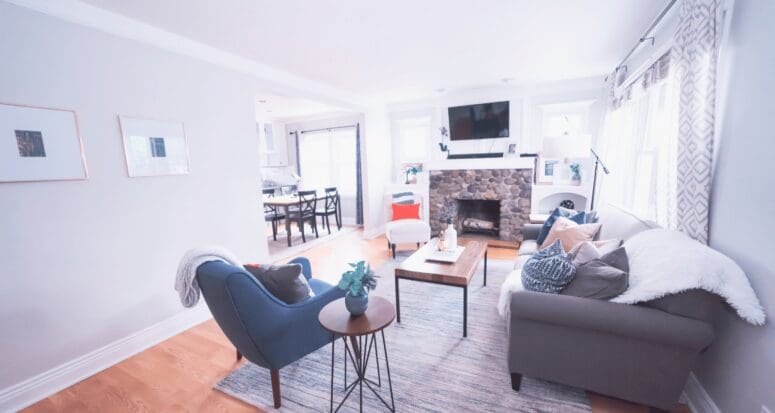
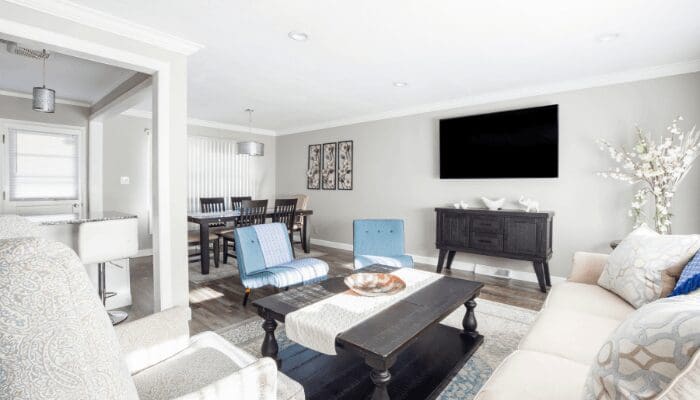
Stage the living room to exude comfort and family time
This is the place where your future buyers will spend most of their time relaxing and hanging out, so make the space feel as cozy as possible with strategic living room staging.
While you want most of the clutter cleared out, bare couches and completely emptied shelves make living rooms look cold and uninviting. Liven up the space with a few well-chosen decor items, like attractive lamps on the end tables, or a few books and tasteful book-ends on the shelves.
Texture and color spell comfort in the living room when used wisely—as long as you don’t go crazy with wild patterns, neon colors, or blinged out textures. Instead, add items like World Market’s $10 velvet pillows on the sofa or a jewel-toned rug on the floors that invite the eye (and your buyers) to linger.
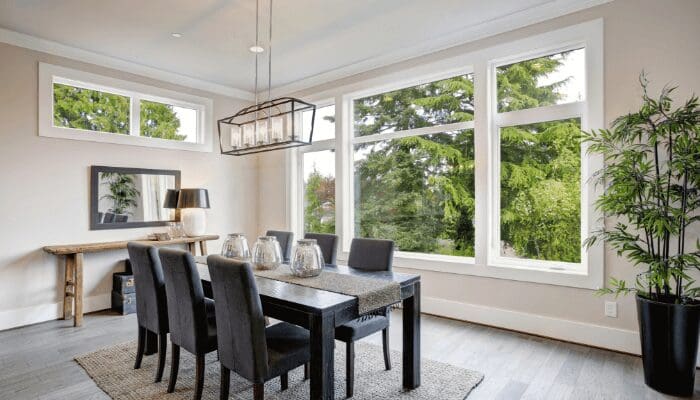
Preserve your formal dining room with classic staging
True, you may have only used your formal dining room a handful of times around the holidays—but if your home has one, you need to stage this space as an asset that your buyers will want to use all year round.
So clear all your craft supplies out of the china hutch and your impromptu office off of the dining table and begin setting up the space as a proper dining room.
While it’s probably safe to keep your good china on display in a cabinet, you don’t need to risk putting place settings out on the table. You can create that same “ready for dinner” feel with an attractive, easy to maintain centerpiece—like a tall vase filled with eucalyptus branches, or a compote overflowing with decorative balls.

Make the master an oasis for relaxation
You may or may not have the time or money to stage every bedroom, but staging the master is an absolute must. This is the place where your buyers will rest their weary heads after working hard to pay the mortgage, so you need the room to look like a restful retreat.
While it’s totally fine if you embraced unconventional colors in the bedroom, like vibrant purple or red velvet bedding, when you’re staging to sell, you need to think soothing colors like blue, gray, or white.
Take it easy on the patterns and decor style, too. Whether your personal bedroom preferences lean more toward feminine florals or masculine graphic patterns, you need to keep your design choices neutral so they appeal to the widest pool of buyers.
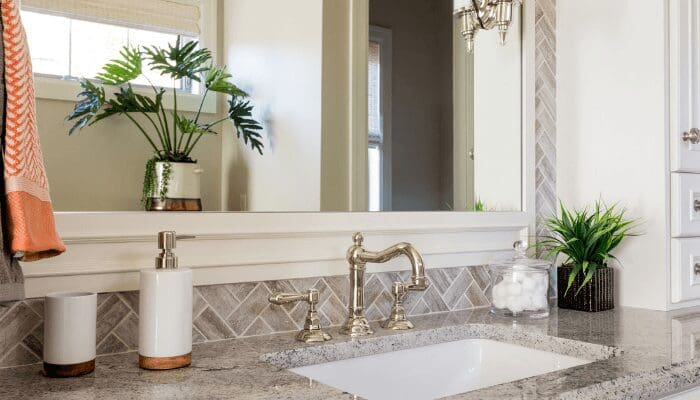
Stage the bathroom with hotel spa vibes
Bathrooms are perhaps the most overlooked space when it comes to staging—because the tub, shower, toilet, sink are staying put unless you do a full remodel. While you may not be able to rearrange the big-ticket items, bathroom staging has endless possibilities.
For starters, take stock of the mirror situation and replace any that are cracked or damaged. The good news is that you don’t have to stick with the boring, basic sink backsplash-to-ceiling models so popular with builders. There are plenty of affordable mirrors in designer styles that can add a touch of class to the space.
And don’t forget to hang fresh, fluffy towels on the towel bar, and put out a brand new, soap scum-free soap dispenser on the vanity as the clean and serene finishing touches.
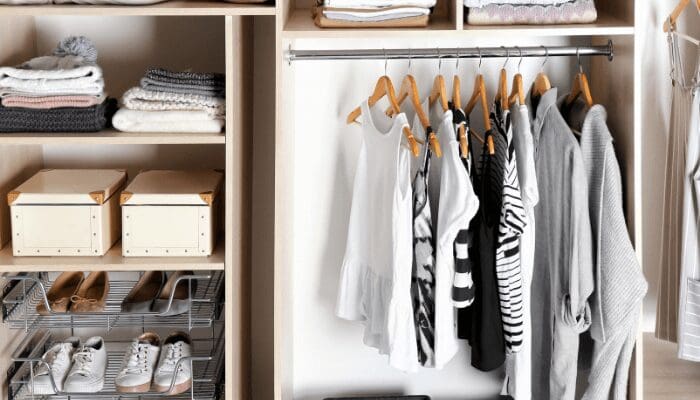
Organize the closet like a showroom
Don’t forget to stage behind closed doors, including the closets! Buyers need to see that your house comes with enough storage space to hold all of their stuff.
But if your closets are currently crammed to the ceiling with your things, your home will look short on storage space. So your staging goal for closets needs to be emptying them until they’re no more than 50% full.
Then you just need to arrange what’s left like it’s a department store display.
The good news is that staging a closet probably won’t cost you anything but time.
There’s absolutely zero chance that you need to buy any decorative items to make your closets look good. The only items you might need to buy are organizational tools like decorative baskets, boxes, hangers, or storage racks.
Down to staging details: Little tricks the pros use that you can, too
Flip through photos of home that are professionally staged versus ones where the homeowners DIYed the staging, and you can almost always spot the difference. That’s because the pros pick up a lot of little tips and tricks through experience.
While a novice will never achieve the same stellar staging that a pro can accomplish, you can give your home an extra touch of pro-like polish by following a few of their tips.
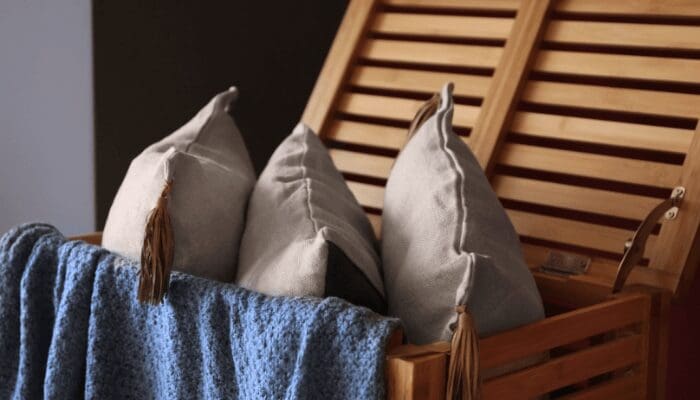
Tip #1: Pops of color
Neutral hues may be the best choice for almost every big item in your staged home, like walls, furniture, and even bedding, the pros know that it’s never wise to completely eliminate all color—or you’ll wind up with a bland look.
“I tell clients with homes that are mainly neutral colors to add bright red or bright yellow accents,” advises Winslow. “Put some brightly-colored placemats and dishes on the table, or jewel-toned throw pillows on the sofa—just little accents to draw the eye amongst all of those earth tones.”
Tip #2: The 60-30-10 rule
Similar to pops of color, the 60-30-10 rule is a design trick designers use to create the right balance of color in a room that’s using three main hues. Using this method, any bright accents pop rather than scream for attention.
The idea is that 60% of the color in a room—the dominant color—should be a neutral, like a light gray. Then 30% of the color should be a complementary, yet still subdued hue, such as a darker gray or a semi-dark blue. Only 10% of the color should be a vibrant, eye-catching color, like yellow, or red.
As an example, in a room with gray walls and neutral flooring, you might place a midnight blue sofa, decorated with two or three yellow throw pillows.
Tip #3: Create vignettes to tell a story
Pillows aren’t the only way to add pops of color. You can add in small moments of vibrant hues by creating interesting vignettes on walls or table tops.
So what are vignettes? They’re essentially small groupings of decorative items arranged together to tell a story.
It might be a color story, such as a series of identical vases in similar hues, shifting from deep peacock green up to pale mint. It could be a style story, such as a nautical lamp, paired with a driftwood candle holder and a bowl of seashells. It could even be a size story, like a wall arrangement of a large mirror, a medium-sized canvas painting, and a slightly smaller framed landscape photograph.
Notice something peculiar about these three examples? They each contain three items each. That’s because the rule of three is the easiest way for the untrained to create vignettes that work.
While pros can make vignettes of two, four, five, or even a dozen items work, it’s not so easy for most people. Typically, just two items looks like something went missing, while more than three just looks cluttered.
Tip #4: Don’t skip staging vacant homes
Homeowners who’ve moved out before they’re ready to sell sometimes think that staging isn’t an issue or an option because the house is already vacant. There’s no need to fear that the house will appear cramped or cluttered. Plus, there’s no existing furniture for a stager to work with.
The truth is that empty homes are the most in need of at least some staging—because vacant homes take longer to sell and may even sell for less money than an occupied, unstaged home.
“Some buyers don’t like empty spaces. They can’t visualize how furniture would fit,” says Winslow. “So even if you just add a chair and a little table in the corner to break up the monotony of an open, empty space.”
You can go all out and rent furniture to stage those main living spaces (living room, dining room, kitchen, master bedroom and bath). Or, if you hire a pro stager, they’ll likely have a warehouse of furniture they can bring in to stage your home—for a rental fee on top of their staging fees.
A less expensive way to achieve similar results without renting big pieces is to
soft stage the house. Unlike traditional staging, this method skips big items like chairs, tables, couches in favor of a handful of decorative items.
Think as minimal as a fruit bowl on the kitchen counter, towels only in the bathroom, and art to break up the vast expanses of barren walls.
Living with staging: Keep things neat from listing to offer
It takes a lot of work to get your home staged like it’s waiting for it’s department store furniture catalog photo shoot.
But it’ll feel like more work trying to keep it clean and staged if you’re still living in the property.
Common sense and commitment are really the only way through it. While it may be your normal habit to clean once a month, when you’re living in a staged-to-sell house, you need to clean as you go—every day.
It’s even harder to keep things clean and staged when there are kids in the house.
“It can be tough keeping a house staged when there are little ones running around,” says Winslow. “Oftentimes I will call the showing brokers and say, ‘Listen, these homeowners have children, so it may not be sparkling clean as it should be.’ But 99 times out of a 100, the parents are able to straighten up the house before the showing begins.”
Short of sending them off to live with their grandparents until the house sells, your best bet is to find secret storage spaces, like storage benches or decorative boxes, so you can quickly whisk all of their toys out of sight before impromptu showings.
Staging: Work that’s worth it
Packing and prepping your home to sell takes so much work, that home sellers are sometimes too exhausted to even think about staging.
If you’re really out of time and energy, you can always go the route of virtual staging—where a digital photography studio simply adds staged furniture, art and decor to the photographs of your rooms that’ll go online.
While this is an easy and cost-effective route, you do run the risk that buyers will be disappointed when they see your home in person and discover it doesn’t match the photos.
In the end, whether you hire a professional stager, DIY the staging, or simply opt for soft staging your vacant home, your effort will pay off when you sell your home for more money in less time.
Article Image Source: (Andrew Barrowman/ Unsplash)
At HomeLight, our vision is a world where every real estate transaction is simple, certain, and satisfying. Therefore, we promote strict editorial integrity in each of our posts.